Mediatrix C7/S7/G7 (FXO/FXS/BRI) — setup for our PBX
Mediatrix is a gateway range from the Canadian company Media5 (now sold under the M5 Technologies brand; documents and part numbers still say "Media5 / Mediatrix"). These are carrier-grade gateways: integrators and telecom operators install them, they cost more than mass-market boxes but are thoroughly documented. All models run the same DGW firmware with the same web interface. For a venue the interesting ones are the desktop C7 units: C730 (4 landlines, FXO ports), C733 (8 lines), C731 (4 lines + 4 analogue phones), and, if the operator's line is ISDN BRI, the C720h / C720 / C740. For an E1/T1 trunk there is the rack-mount G7. The S7 and C710/C711 are for analogue phones only (FXS ports) — a landline cannot be connected to them.
For our PBX the gateway is just another extension: it registers with the PBX server and itself dials the ring group or operator number when someone calls the line. What is common to all gateways (credentials, where to send incoming calls, network, limitations) is in the overview "GSM gateways and landlines". This page is the step-by-step guide for Mediatrix, with screens from the manufacturer's documentation.
Two Mediatrix specifics worth knowing up front:
- most SIP changes only take effect after the restart required services link at the top of the page (or System → Services) — without it the gateway keeps running on the old values;
- from the factory the gateway has a
publicaccount with no password and administrator rights — close it right after logging in (step 2).
What you need#
- Extension credentials from the admin panel: Telephony → Operators → create an operator for the gateway (for example, "Mediatrix gateway, landline") → "Reset password" → the "Extension credentials" window: SIP server, Extension number, Login, Password, Port
5060, TransportUDP. The password is shown once — copy it into the gateway straight away. Details — "Extension credentials for a gateway". - How many extensions: one for the whole gateway. Mediatrix can register with one shared account for all ports (Unit Registration) — the simplest option. If you need to tell the lines apart in the PBX, you can give each port its own extension (block in step 3).
- The number the gateway will send incoming calls to: a ring group number (Telephony → "Ring groups", numbers from 700) or an operator's extension number.
- Line: an analogue landline into an FXO port (RJ-11), or an ISDN line from the operator's equipment into a BRI port (on the G7 — an E1/T1 trunk).
- A network with DHCP (the venue's router), a network cable, a computer with a browser and a mobile phone to call the line.
Step 1. Find the gateway's IP address#
A Mediatrix has two network ports with different factory settings:
| Port | Factory setting | How to connect |
|---|---|---|
| ETH1 (WAN, primary) | gets an address from the router via DHCP | cable from the venue's router or switch |
| ETH2 (LAN; on the G7 — ports ETH2–ETH5) | static address 192.168.0.10, mask 255.255.255.0 |
cable straight into a computer; give the computer the address 192.168.0.11 with the same mask |
How to find the address obtained via DHCP:
- The Power LED blinks while the gateway waits for an address from the DHCP server and turns steady once it has one. The address itself is in the router's DHCP client list (look it up by the MAC address on the label under the case).
- From a phone — only on models with FXS ports (C731, a C7 with an FXS card, S7): plug an ordinary analogue phone into an FXS port, lift the handset and dial
*#*0— the gateway reads out its address. The C730 and C733 have no FXS ports. - Without DHCP — connect a laptop to ETH2 and open
http://192.168.0.10.
The MAC address and current status are also shown in the web interface: System → Information.
Step 2. Log in to the web interface#
Open http://<gateway address> in a browser (HTTP, port 80; HTTPS is also available).
| What | Value |
|---|---|
| Username and password | admin / administrator |
| Second factory user | public — empty password, administrator rights |
Close public straight away. As long as this account has no password, anyone on the venue's network can log in to the gateway with administrator rights. Mediatrix does not force a password change on first login — do it manually: Management → Access Control → Users table → delete public (or give it a password) and change the admin password. User names are case-sensitive. If you delete all users, the factory ones come back after a reboot.
Tip: the Show Help button in the top right corner of the page highlights fields that have help — the description pops up on hover.
Media5 recommends starting its configuration procedures from factory settings. If the gateway has been used before, reset it first (see "Factory reset" below).
Step 3. Enter the PBX credentials#
Mediatrix separates three things: where to register (SIP/Servers), what to answer when asked for a password (SIP/Authentication) and under which name to register (SIP/Registrations). Fill in all three.
3.1. PBX address — SIP → Servers. In the Default Servers table: Registrar Host and Proxy Host — <SIP server>:5060 (both fields, the same value). Write the port explicitly: with a server name and port 0 or no port, the gateway may look for a DNS SRV record, which our server does not have. Leave Messaging Server Host and Outbound Proxy Host empty. Click Apply, then restart required services at the top of the page.
 Screenshot: Configuration Note "Basic FXO Mediatrix Unit Configuration with Asterisk" (DGW 49.2.2941, 2023-08-09), p. 9. The values are the manufacturer's example; for our PBX both fields hold the SIP server with
 :5060.
3.2. SIP gateway — SIP → Gateways. In the Gateway Configuration table the default row must have Type = Trunk (the factory value; shared registration only works with this type) and Port = 0 (which means 5060). Usually nothing needs changing.
3.3. Transport — SIP → Transport. In Protocol Configuration: UDP = Enable (we accept TCP too). Do not enable TLS: our PBX has no TLS, and on a Mediatrix enabling TLS turns off UDP and TCP.
3.4. Login and password — SIP → Authentication. In the Authentication table open the default gateway row (edit icon) and set: Validate Realm = Disable, Realm — empty, User Name — the full Login sip-…-<number>, Password — the Password. Click Apply and Refresh Registration.
 Screenshot: Configuration Note "Basic FXO Mediatrix Unit Configuration with Asterisk" (DGW 49.2.2941, 2023-08-09), p. 10. Replace
 $Example with the extension login and password.
3.5. Registration — SIP → Registrations. In the Unit Registration table: User Name — the same full Login, Gateway Name = All. Click Apply and Refresh, then restart required services.
 Screenshot: Configuration Note "Basic FXO Mediatrix Unit Configuration with Asterisk" (DGW 49.2.2941, 2023-08-09), p. 11. Replace
 default_user with the extension login.
3.6. Apply — System → Services → restart required services, if the link is still shown.
| In the admin panel ("Extension credentials") | Where in the Mediatrix gateway |
|---|---|
| SIP server | SIP → Servers → Registrar Host and Proxy Host (<SIP server>:5060) |
Login sip-…-<number> |
SIP → Registrations → Unit Registration → User Name and SIP → Authentication → User Name — the full string in both places |
| Password | SIP → Authentication → Password (Validate Realm = Disable) |
Port 5060 |
:5060 in Registrar Host and Proxy Host; SIP → Gateways → Port = 0 (= 5060) |
Transport UDP |
SIP → Transport → UDP = Enable, TLS = Disable |
| Extension number | not entered — just remember which extension the gateway uses |
Codecs, DTMF, NAT
- Codecs — Media → Codecs: keep
G.711 A-lawandG.711 µ-lawenabled (they are always available). The other Mediatrix codecs come in "banks" (Select Codec Bank: G.722, G.723.1, G.726 or G.729) — G.711 is enough for our PBX, it does not use G.729. - DTMF — Media → Misc → DTMF Transport table → Transport Method =
Out-of-Band using RTP(this is RFC 2833), Payload Type =101. The manufacturer calls this the preferred method. - NAT — behind the venue's router the gateway works without port forwarding: it keeps the registration alive itself. Turn off SIP ALG on the router. According to the documentation, the Keep-Alive table on the SIP/Servers page is not required in most cases.
Different lines as different extensions (Endpoints Registration)
If you want each line to arrive in the PBX as its own extension, create one operator per port in the admin panel and use port registration instead of Unit Registration:
- SIP → Registrations → Endpoints Registration table: Register =
Enableon each FXO port, Gateway Name =default→ Apply and Refresh. - SIP → Authentication → Edit All Entries (bottom of the page): one row per port — Criteria =
Endpoint, Endpoint = the port, Validate Realm =Disable, User Name / Password — the credentials of its extension → Apply and Refresh Registration.
The login in the "From" field (step 4.4) is needed in this mode too. In total the C7 holds up to 64 registrations, the G7 and S7 up to 500.
Step 4. Send incoming calls to the PBX#
A call from an analogue line has no destination number, so the gateway needs to be told two things: that calls from the FXO ports go towards the PBX (the route) and which number to dial (Automatic Call).
4.1. FXO → PBX route — Call Router → Route Config. In the Routes table click ➕ and fill in Configure Route: Sources — pick all FXO ports from the Suggestion list (in the screenshot — fxo-Slot4/FXO1 … FXO4), Criteria Property = None, Destination = sip-default → Save.
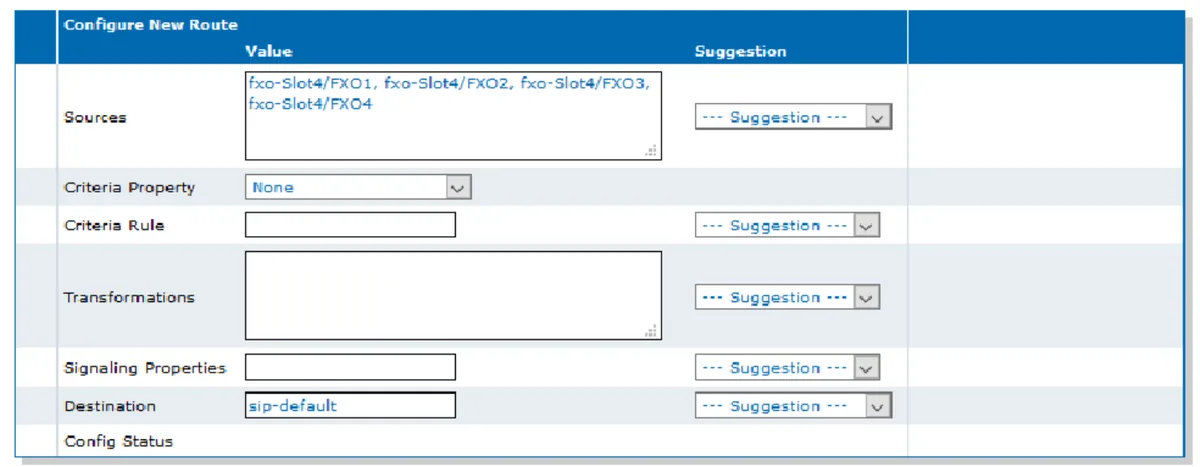 Screenshot: Configuration Note "Basic FXO Mediatrix Unit Configuration with Asterisk" (DGW 49.2.2941, 2023-08-09), p. 12.
4.2. Number in the PBX — Telephony → Services. In the Select Endpoint list pick an FXO port, then in the Automatic Call section: Endpoint Specific = Yes, Automatic Call Activation = Enable, Automatic Call Target = the ring group number (from 700) or an operator's extension → Apply. Repeat for each port; different lines can go to different groups.
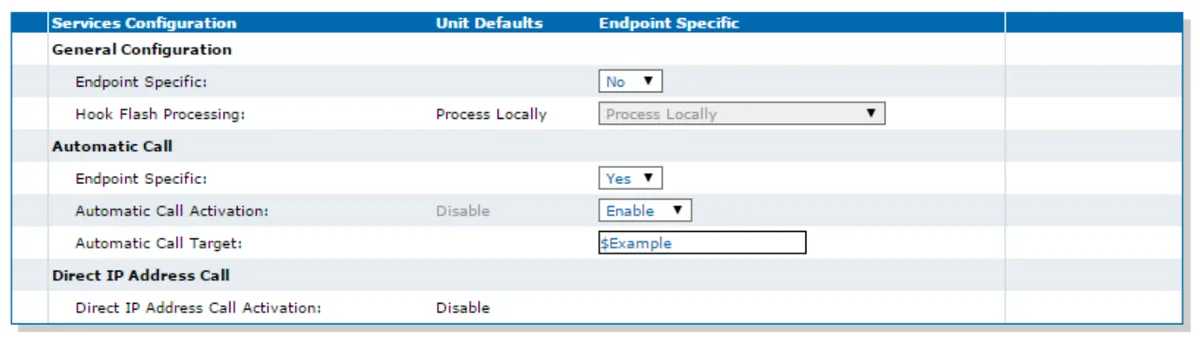 Screenshot: Configuration Note "Basic FXO Mediatrix Unit Configuration with Asterisk" (DGW 49.2.2941, 2023-08-09), p. 15. Replace
 $Example with the ring group or operator number.
4.3. Line country — Telephony → Misc. Select Endpoint = Default, pick your country in the Country table → Apply. The country sets the tones, line parameters and caller ID format; the documentation does not say which country is set from the factory, so always set it.
4.4. Login in the "From" field. Our PBX recognises an extension by the login in the From field of the call. According to its documentation (DGW Call Properties), Mediatrix puts the caller's number from the line's caller ID there, and if there is no number — the word anonymous. Without a fix the registration will be green, but calls from the line will be rejected. The login is inserted with a Call Property Transformation in Call Router → Route Config:
- Transformations table → ➕: Name — for example
to-pbx; Transformation Applies To =Calling SIP Username(the caller's SIP name — on a Mediatrix it takes priority over the number and goes intoFrom); Criteria Based On — no condition (in the Call Router guide's example themap911transformation has none) → Save and Insert Rule. - In Configure Transformation Rule: Name =
to-pbx, Criteria — empty, Transformation — the full Loginsip-…-<number>→ Save. - Open the route from step 4.1 and pick
to-pbxin the Transformations field → Save.
This step is written from the Media5 guides; we have not yet tested it on a live Mediatrix. You see the result immediately: if afterwards a call from the line reaches the group (step 5), it is right; if it is still rejected, ask the gateway supplier how to set Calling SIP Username for FXO calls.
Caller's number. When the login goes into From, the call shows up in the operator panel as coming from the gateway's extension — the PBX does not show the caller's number yet. The routing rules for provider numbers (schedule, voice menu) do not apply to calls from a gateway — a ring group with its own time-based options does the same job (see "Where to send incoming calls").
Outgoing calls. Calling out from the PBX through this gateway's lines is not possible yet: the PBX outbound rule only leads to a SIP provider line. The Mediatrix itself can do it (a sip-default route → a group of FXO ports in the Hunt table), but do not configure that part for our PBX. Outgoing calls from your own number go through a SIP provider; more in "Outgoing calls through a gateway — not yet".
FXO lines: answering, caller ID and disconnect
- When the gateway picks up — POTS → FXO Configuration → FXO Answering Configuration → Wait Before Answering Delay. The delay is there to receive the caller's number between rings. If the operator does not send the number, Media5 advises lowering it to
2500ms — the caller reaches the PBX faster. - Caller ID — per country (Telephony → Misc → Country): FSK (Bellcore, ETSI and others) or DTMF, up to 20 digits.
- Disconnect. The main signal is loss of loop current on the line. If the operator does not provide it and the call "hangs" at the operator after the caller has hung up, enable extra signals in POTS → FXO Configuration → FXO Force End of Call: on the busy tone (Force End Of Call On Tone Detection Mode — the country tone or your own Custom Tone) and on silence (Force End Of Call On Silence Detection Mode).
- Do not connect FXO and FXS ports to outdoor wiring: the manufacturer warns about hazardous line voltages.
ISDN BRI (C720h, C720, C740) and E1/T1 (G7)
The principle is the same as for an analogue line: a route in Call Router → Route Config with Sources = the BRI ports (PRI on the G7) and Destination = sip-default, plus the to-pbx transformation from step 4.4. The difference is the destination number: an ISDN line itself delivers the dialled number (MSN on BRI, DDI on PRI), and our PBX does not know such numbers on a gateway extension. It is rewritten into the group number by a second transformation with Transformation Applies To = Called E164: Criteria — the number the operator sends, Transformation — the ring group number. A separate rule per number spreads the numbers across different groups.
A BRI port is set as TE (towards the operator's line) or NT (towards an old ISDN PBX), protocol DSS1 (EuroISDN) or QSIG. The C7 does not power ISDN phones. The documents this page is based on have no step-by-step ISDN guide — get the line parameters from the operator and the steps from the gateway supplier.
Step 5. Check registration and a call#
- Registration in the gateway. SIP → Registrations → Unit Registration Status table — the row with your login should show a successful registration.
- Registration in the admin panel. Telephony → "Operators" tab — the gateway's extension has a green dot.
- Call. Call the landline number from a mobile — the operators of the group (or the operator) from Automatic Call Target should ring. Hang up — the call at the operator should end within seconds; if it hangs, see "FXO lines" in step 4.
- Audio —
*43echo test. Registration says nothing about audio. Temporarily put*43in the port's Automatic Call Target and call the line: the PBX plays a short beep and then returns your voice with a delay — talk for about ten seconds. You hear the beep and yourself — audio works both ways; the beep but not yourself — audio does not reach the PBX from the gateway; not even the beep — audio does not reach the gateway from the PBX. The test result is shown in the call log. Afterwards put the group number back and click Apply.
Everything about testing — in the overview, section "How to check".
Factory reset#
A reset is needed if the password or address is forgotten, the gateway came with someone else's configuration, or you are starting a Media5 procedure (it requires factory settings). The Reset/Default button is recessed in the case and pressed with a paper clip on a powered-on gateway. What happens depends on how long you hold it — watch the LEDs:
| LEDs | When to release | Result |
|---|---|---|
| only Power blinks | right away | reboot, settings unchanged |
| all blink once a second | within 7–11 seconds | partial reset: user passwords return to factory values, a rescue management address 192.168.0.1 is enabled on port ETH1, the rest of the configuration is kept |
| all steady on | after 12–16 seconds | factory reset |
| turned off | longer | the reset is cancelled — handy if the button was pressed by accident |
From the web interface: Management → Firmware Upgrade → factory reset (on the command line — the fpu.defaultsetting parameter).
What a factory reset erases: all configuration, user files, certificates (except factory ones) and logs. Do it on a network with DHCP: without a DHCP server the gateway sends requests forever.
What to do afterwards:
- After a factory reset the gateway again gets an address via DHCP on ETH1 and answers on
192.168.0.10on ETH2; login isadmin/administratororpublicwith no password. Start from step 1, closepublicstraight away, and set up SIP/Servers, Authentication, Unit Registration, the route, Automatic Call, the country and the login transformation again. - After a partial reset connect to ETH1 from a computer with an address in
192.168.0.xand openhttp://192.168.0.1. When done, turn the rescue address off: Management → Misc → choose the working management network interface (not Rescue, or you will lose access) → Apply; then Network → Interfaces → Rescue Interface table → Activation =Disable→ Apply. The manufacturer reminds you to set up user passwords and firewall rules again — otherwise the gateway stays unprotected.
Resetting the gateway does not change the extension's login and password in the admin panel; if you did not keep the extension password, issue a new one with "Reset password". General notes on resetting gateways — in the overview.
If the gateway does not register#
- Changes not applied. After Apply you did not click restart required services (top of the page or System → Services) — the gateway runs on the old values.
- Login not entered everywhere. The full login
sip-…-<number>must be in both Unit Registration → User Name and SIP/Authentication → User Name; in Unit Registration Gateway Name =All; in Authentication Validate Realm =Disablewith an empty Realm. - Server address without a port. Without
:5060in Registrar Host and Proxy Host the gateway may look for an SRV record for the server name and not find it. Add the port explicitly. - TLS is enabled. On a Mediatrix it turns off UDP and TCP at once. SIP → Transport:
UDP=Enable,TLS=Disable. - Registration is green but calls from the line are rejected. The "From" field carries the caller's number or
anonymousinstead of the login: the transformation from step 4.4 is missing or not attached to the FXO →sip-defaultroute. - The line rings but the PBX stays silent. The route from step 4.1 is missing, Automatic Call is not enabled on the port (Endpoint Specific =
Yes, Activation =Enable), or Automatic Call Target holds a number that does not exist in the PBX. Check that the group number can be dialled from any PBX phone.
Cannot open the web interface after a partial reset — go to 192.168.0.1 via port ETH1 (see "Factory reset"). General causes (SIP ALG on the router, UDP 5060 blocked) — in the overview, section "If the gateway does not register"; about the network — "Venue network, NAT and SIM card".
Models in the family#
A C7 model number encodes its two cards: the last digits are 1 = 4 FXS, 2 = 2 BRI, 3 = 4 FXO, 4 = 4 BRI, 5 = 2 FXS, 7 = 2 FXO, H = 1 BRI. Hence C731 = FXO + FXS, C733 = two FXO cards.
| Model | Ports / channels | Network / line | Setup differences |
|---|---|---|---|
| C730 | 4 FXO; 2 × 10/100 Ethernet (ETH1 — WAN, ETH2 — LAN) | landline | as on this page; desktop or wall-mount, external 12 V power supply |
| C733 | 8 FXO (two cards) | landline | the densest FXO model of the C7; route and Automatic Call on all 8 ports |
| C731 | 4 FXO + 4 FXS | landline + analogue phones | the address can be read with *#*0 from a phone on FXS; phones on FXS are extensions, see "SIP phone setup" |
| C720h / C720 / C740 | 1, 2 or 4 BRI (2, 4 or 8 channels) | ISDN BRI | TE/NT port, EuroISDN or QSIG; route from the BRI ports; no power for ISDN phones. Check availability with the supplier — M5 asks to confirm the order code |
| C721 / C725 / C741 / C745 | 2 or 4 BRI + 4 or 2 FXS | ISDN BRI + phones | like the C720/C740 |
| G7 | 1, 2 or 4 E1/T1 (up to 120 channels), 8 BRI, 4 or 24 FXO, 8 FXS — to order; 5 × GE; 1U 19″ | ISDN PRI, BRI, landline | same firmware and menus; LAN ports ETH2–ETH5; up to 500 registrations; built to order by part number |
| S7 / S7 LP | 16 or 24 FXS | phones only | a landline cannot be connected — this is a gateway for analogue phones |
| C710 / C711 | 4 or 8 FXS | phones only | same as the S7, in a desktop case |
| Mediatrix 1204, 4400, 3000 | FXO / 1–4 BRI / E1-T1 | — | discontinued, replaced by the C7 and G7; they also run DGW, but older versions — menu items may differ |
For one or two analogue lines a Mediatrix is overkill — there are simpler and cheaper gateways (see the family table in the overview). It makes sense if the venue already has one (often left over from a telecom operator) or needs ISDN BRI and E1 from a manufacturer with detailed documentation.
FAQ#
Can I call out from the PBX through this gateway using the landline number?#
Not yet — with us the gateway only handles incoming calls. The Mediatrix itself can make outgoing calls (a sip-default route → a group of FXO ports picking a free line), but our PBX does not yet send calls to a gateway extension as if it were a line. Outgoing calls from your own number go through a SIP provider.
How many extensions does a 4- or 8-line gateway need?#
One: Unit Registration registers the gateway with one account, and calls from all lines go through it. If you need to tell lines apart in the PBX — Endpoints Registration, one extension per port (block in step 3).
Why is registration green but calls from the line are not accepted?#
A Mediatrix puts the caller's number or anonymous in the "From" field, while our PBX recognises the extension by its login. You need the transformation Calling SIP Username = login on the FXO → sip-default route (step 4.4).
Why can't I see the caller's number in the panel?#
So that the PBX recognises the call as coming from the extension, the gateway's login goes into the "From" field. The PBX does not show the caller's number yet — the call appears as coming from the gateway's extension.
Is the public account dangerous?#
Yes, as long as it has no password: from the factory it lets anyone into the gateway without a password and with administrator rights. Delete it or set a password in Management → Access Control → Users. After a partial reset passwords return to factory values — check again.
I changed settings but the gateway behaves the old way?#
Click restart required services at the top of the page or in System → Services. Without it some SIP changes are not applied.
Sources#
Media5 (Mediatrix) / M5 Technologies documents, accessed 10.09.2026:
- Model C — Mediatrix C7 Series, Hardware Installation Guide (DGW 49.2, 2023-08-09) — https://documentation.media5corp.com/download/attachments/62825807/Model%20C%20Mediatrix%20C7%20Hardware%20Installation%20Guide.pdf
- Model M — Mediatrix G7 Series, Hardware Installation Guide — https://documentation.media5corp.com/download/attachments/62825807/Model%20M%20Mediatrix%20G7%20Hardware%20Installation%20Guide.pdf
- Model M — Mediatrix S7 and S7 LP Series, Hardware Installation Guide — https://documentation.media5corp.com/download/attachments/62825807/Model%20M%20Mediatrix%20S7%20and%20Mediatrix%20S7%20LP%20Series%20Hardware%20Installation%20Guide.pdf
- Configuration Note — Basic FXO Mediatrix Unit Configuration with Asterisk (DGW 49.2.2941, 2023-08-09) — https://documentation.media5corp.com/download/attachments/45481987/Basic%20FXO%20Mediatrix%20Unit%20Configuration%20with%20Asterisk.pdf
- Configuration Note — Basic FXO Gateway Configuration — https://documentation.media5corp.com/download/attachments/45481987/Basic%20FXO%20Gateway%20Configuration.pdf
- Technical Bulletin — Basic SIP Unit Registration — https://documentation.media5corp.com/download/attachments/45482024/Basic%20SIP%20Unit%20Registration.pdf
- Technical Bulletin — Basic SIP Endpoint Registration — https://documentation.media5corp.com/download/attachments/45482024/Basic%20SIP%20Endpoint%20Registration.pdf
- DGW Configuration Guide — Call Properties — https://documentation.media5corp.com/download/attachments/62825785/Call%20Properties.pdf
- DGW Configuration Guide — Call Router — https://documentation.media5corp.com/download/attachments/62825785/Call%20Router.pdf
- DGW Configuration Guide — POTS Configuration — https://documentation.media5corp.com/download/attachments/62825785/POTS%20Configuration.pdf
- DGW Configuration Guide — SIP Transport — https://documentation.media5corp.com/download/attachments/62825785/SIP%20Transport.pdf
- DGW Configuration Guide — Codec Configuration — https://documentation.media5corp.com/download/attachments/62825785/Codec%20Configuration.pdf
- Delta Document from Mediatrix 4400 to C7 Series (BRI models) — https://documentation.media5corp.com/download/attachments/44413839/Delta%20Document%20from%20Mediatrix%204400%20to%20C7%20Series.pdf
- Mediatrix C7 Series Datasheet — https://documentation.media5corp.com/download/attachments/62825807/Mediatrix_C7_Series_datasheet.pdf
- Mediatrix G7 Series Datasheet — https://documentation.media5corp.com/download/attachments/62825807/Mediatrix_G7_Series_datasheet.pdf
- M5 Technologies — Mediatrix C7 Series — https://www.m5technologies.com/pages/mediatrix-c7-series