beroNet (modular BRI/PRI/FXO/GSM/LTE) — setup for our PBX
beroNet makes modular gateways in Germany. Modules go into a chassis (BNSBC-M, BNSBC-L, BNSBC-XL; formerly BF400Box / BF1600Box / BF6400Box): ISDN BRI, ISDN PRI E1, FXO for an analogue landline, FXS for analogue phones. The mobile models are called VoLTE SBC: they take SIM cards, and there are hybrids with "SIM + line" in one box. All of them run the same firmware (beroNet OS), so the web interface is the same from the entry-level Small Business Line to the BNSBC-XL. It is a choice for a venue in Europe whose landline is still ISDN or which has an old small PBX, and for a SIM-card backup line. For one or two analogue lines without ISDN there are simpler and cheaper gateways — see the family table in the overview.
To our PBX the gateway is just another extension: it registers on the PBX server and, when someone calls the line or the SIM card, dials a ring group or an operator by itself. What is the same for all gateways (credentials, where to send incoming calls, network, limitations) is in the overview “GSM gateways and landlines”. This page is the step-by-step guide for beroNet, with screens from the manufacturer's documentation.
beroNet's setup order is always the same: PSTN → Hardware (modules) → PSTN → Port-Groups (port groups) → SIP → SIP (account) → Dialplan (routes). Changes do not apply immediately — only with the activate button that appears after saving. Its colour tells you what will happen: red — a full reboot of the gateway (hardware and network settings), orange — a restart of the ISGW service in a few seconds (line settings), yellow — applied instantly without dropping calls (SIP and Dialplan). Graceful mode waits until the current calls end.
What you need#
- Extension credentials from the admin panel: Telephony → Operators → create an operator for the gateway (for example, “beroNet gateway, ISDN”) → “Reset password” → the “Extension credentials” window: SIP server, Extension number, Login, Password, Port
5060, TransportUDP. The password is shown once — copy it into the gateway right away. Details — “Extension credentials for the gateway”. - How many extensions: the simplest is one for the whole gateway — all lines in one port group, one SIP account. beroNet can also use a separate account per line or SIM card (for SIM cards the manufacturer explicitly recommends it) — then create one extension for each, see step 3.
- The number the gateway will send incoming calls to: a ring group number (Telephony → “Ring groups”, numbers from 700) or an operator's extension number.
- The line: ISDN from the carrier's equipment into a BRI or PRI port (RJ-45), an analogue landline into an FXO port (RJ-11), or a SIM card in an LTE module. For a SIM, know its PIN (unless it is disabled) and the carrier's SMS centre number.
- A network cable, a computer with a browser (Windows or Linux to find the gateway with bfdetect) and a mobile phone to call the line.
Step 1. Find the gateway's IP address#
Out of the box the gateway gets an address from the venue's router via DHCP. If there is no DHCP server on the network, it comes up on the fallback address 10.0.0.2 with mask 255.0.0.0. You can connect a laptop to it directly by giving the laptop an address in the same network (for example 10.0.0.10, mask 255.0.0.0).
If the gateway is already on the network and the address is unknown:
- bfdetect — a free beroNet tool for Windows (x86/x64) and Linux, in the “Tools and Downloads” section of the manufacturer's wiki. It lists all beroNet devices on the subnet and can change their network settings: turn DHCP on or off, set the address, mask and gateway (save with the
skey). Run it as administrator. - The DHCP lease list in the venue's router.
The BF400e / BF1600e / BF6400e PCIe card appears to the computer it sits in as a network card with its own IP — bfdetect finds it too, and without DHCP it takes 10.0.0.2.
Better turn bfdetect off after setup
By default bfdetect can rewrite the gateway's network settings from any computer on the same network. After setup, turn this off: Preferences → Network Settings → bfdetect-Settings → Off (or Detection Only — discovery only). The same network settings switch the gateway from DHCP to a static address.
Step 2. Log in to the web interface#
Open http://<gateway IP address> in a browser — the login page appears straight away.
| What | Value |
|---|---|
| Login | admin |
| Password | admin |
| Where to change the password | Preferences → Security, or the link in the red warning “The default password should be changed” at the top of the page |
| New password rules | at least 5 characters: an uppercase and a lowercase letter, a digit and a special character |
Change the password right away — while the factory one is set, the gateway reminds you on every page. The web interface menu: Dialplan · SIP · PSTN · Preferences · Management · Apps · beroCloud. The GUI Mode: Easy / Advanced switch at the top reveals extra fields; the language is English or German.
Gateway security on the venue network
- Firmware. In firmware 2.X and 3.X, files (including SIP settings) could be downloaded from the web interface without logging in; fixed in 3.0.16 and from version 16.05. Update a second-hand gateway with old firmware (Management → Firmware Update). Firmware 23.01 installs only on top of 20.06 or 21.03 and newer — update in steps.
- Access. Preferences → Security has a list of allowed networks (ACL); by default the network on port eth0 is allowed. Until the ACL is set, the gateway shows the warning “Full access is granted on several ports”. Do not expose the gateway's web interface to the internet.
Step 3. Enter the PBX credentials#
The SIP account is created in SIP → SIP → Add. The wizard offers a ready carrier profile (Deutsche Telekom, easybell, Vodafone and others) or Manual — choose Manual. The SIP CONFIGURATION window opens, with tabs Settings, SIP, Media and more.
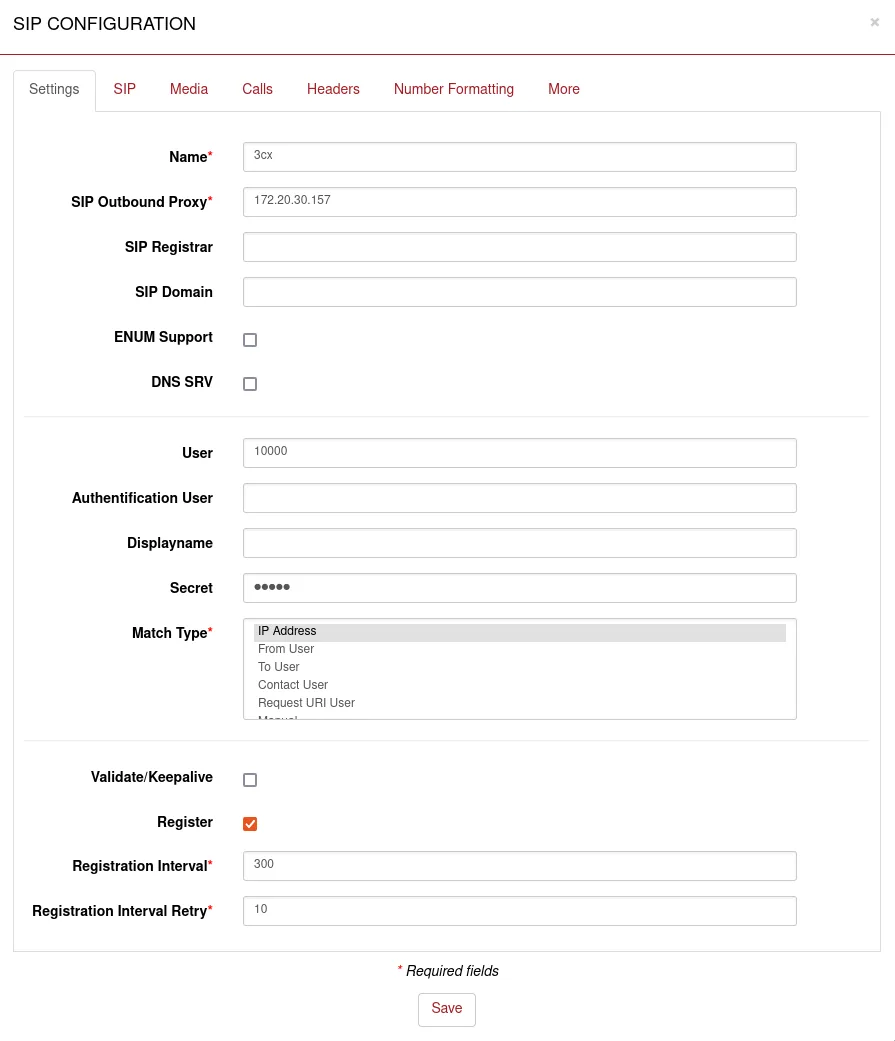 Screenshot: beroNet wiki, “How to configure a beroNet Gateway with 3CX V20” — registering the gateway on an external PBX.
| In the admin panel (“Extension credentials”) | Field in the SIP CONFIGURATION window |
|---|---|
| SIP server | SIP Outbound Proxy (required field) — and the same address in SIP Registrar and SIP Domain |
Login sip-…-<number> |
User and Authentification User — the whole string in both fields |
| Password | Secret |
Port 5060 |
leave SIP Port empty (5060 by default) or append the port to the server address: <SIP server>:5060 |
Transport UDP |
SIP transport = udp (TCP is accepted too; we have no TLS) |
| Extension number | not entered — just remember which extension the gateway uses |
Other fields:
- Name — any name in Latin letters without spaces or special characters (for example
PBX): the Dialplan picks the account by it. - Match Type —
IP Address(default). - Register — tick it, Registration Interval —
300. Without registration our PBX will not know where the gateway is. - Validate/Keepalive — tick it: every 30 seconds the gateway checks the link to the server, which helps behind the venue's router.
- NAT options —
No-NAT(default); STUN is not needed.
If SIP transport, SIP Port and NAT options are not on the Settings tab, open the SIP tab of the same window. Then Save and activate.
What the Register box does. With it, beroNet puts the account name from the User field into the “From” header itself — exactly what our PBX uses to recognise the extension. The caller's number from the line then goes into the display name. Nothing needs to be rewritten by hand.
Codecs, DTMF, and why the wiki says “do not tick Register”
- Codecs and DTMF — the Media tab of the account. In Codecs keep
alawandulaw(A-law first in Europe). G.722 is not listed in beroNet's specifications, and our PBX does not use G.729 / G.726. DTMF Tones =RFC 2833. SRTP =off. T.38 is on by default — harmless. - Register and Asterisk. The older wiki article “SIP configuration of a beroNet VoIP Gateway” says that for an Asterisk-based PBX the Register box should not be ticked. That refers to a PBX where the gateway is configured by hand by IP address. Our PBX does not know the gateway's address, so for it Register is mandatory — the same as in beroNet's guide for 3CX V20.
- General SIP settings (SIP → SIP Stacks) — port 5060 and the RTP range for all accounts; no need to change them for our PBX.
Several SIM cards or lines — one extension each
For VoLTE SBC the manufacturer recommends a separate SIP account for each SIM card; for FXO either one account for all lines (“Hunt group configuration”) or an account and a port group per line (“Single trunk configuration”). With several accounts on one server, set Match Type = To User in each — otherwise the gateway cannot tell which account a call is for. Each SIM or line then needs its own extension in the admin panel and its own Dialplan rule (step 4).
Step 4. Send incoming calls to the PBX#
First, group the lines into a port group: PSTN → Port-Groups → Add, pick the technology (ISDN, Analog, LTE), a group name and the ports. For one extension for the whole gateway, put all ports into one group.
Line settings before the route: ISDN, FXO, LTE
- ISDN (BRI / PRI). In PSTN → Hardware each port is switched in software: towards the carrier — TE mode, towards an old small PBX — NT; protocol PTP or PMP — as on the carrier's line; the 100-ohm terminators are enabled there too. Take the clock from the carrier's ISDN port (TDM Clock Master). Hardware changes are applied with the red activate button — with a reboot.
- FXO. In PSTN → Hardware pick the country of the line: signals and tones depend on it. Besides countries there are
FCCandTBR21modes; for Germany the manufacturer names a German profile (1TR110_DEin the 23.01 web interface document,1TR100_DEin the “FXO configuration” article — check which one your firmware list shows). If there is noise on the line or a call does not end after hang-up, try another profile. The FXO port group has a CLIP field — the number of that line. - LTE (VoLTE SBC). The SIM PIN (empty if the PIN is disabled) and the SMS centre number go on the LTE general page. Put each SIM into its own port group. The carrier is chosen automatically (
Automatic); manually — via the Scan Providers link on the Hardware page (the scan takes about a minute; do not pick carriers markedforbidden).
The route is created in Dialplan → Add. A rule is made of “condition → action” pairs: on the left, where the call came from and which number was dialled; on the right, where to send it and with which number.
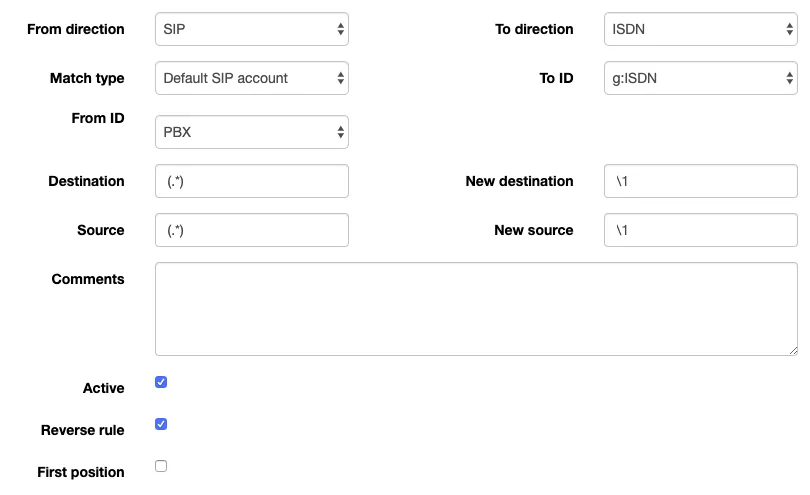 Screenshot: beroNet wiki, “beroNet OS Web Interface (firmware 23.01)”, Dialplan section. The manufacturer's example is a rule for the opposite direction — from the PBX to ISDN; for incoming calls choose the direction from the line to SIP, as in the table below.
The rule for incoming calls from a line or SIM card:
| Field | Value |
|---|---|
| From direction | ISDN, Analog or LTE — where the call comes from |
| From ID | your port group (or one port of it) |
| To direction | SIP |
| To ID | the SIP account from step 3 (by its Name) |
| Destination | (.*) — any dialled number |
| New destination | the ring group number (for example 701) or an operator's extension number — instead of the factory \1 |
| Source / New source | (.*) / \1 — the caller's number unchanged |
The key field is New destination. By default it holds \1: the gateway passes the number on exactly as it got it from the carrier, and our PBX finds no such destination — the call arrives and goes nowhere. Put the group number there (this is how the manufacturer describes the route in the article about several SIM cards: “change the entry in New Destination from \1 to the expected number”). Save and press the yellow activate — the rule applies without a reboot.
Rules are read top to bottom and the first match wins, so put specific rules above general ones (the arrows in the Position column). With several SIM cards or lines — one rule per port group, each to its own account and its own number.
The caller's number. Over ISDN it comes from the carrier, over an analogue line through caller ID (CLIP), from a SIM as the network Caller ID. With Register ticked, beroNet passes it in the display name of the “From” header. Whether it shows up in the operator's call card — check with a test call. Routing rules for provider numbers (schedule, voice menu) do not apply to calls from a gateway — a ring group with its own time-based options covers the same need (see “Where to send incoming calls”).
Outgoing calls. Calling out from the PBX through this gateway's lines or SIM cards is not possible yet: the PBX outgoing rule only leads to a SIP provider line. beroNet itself can do the opposite direction (a rule from SIP to a port group), but do not set it up for our PBX. For outgoing calls from your own number use a SIP provider — see “Outgoing calls through a gateway — not yet”.
Step 5. Check registration and a call#
- Registration in the gateway. Management → State, the SIP Status table: a green dot in the Registration State column means registered, red means not. A grey dot in Validation State means Validate/Keepalive is off.
- The line. On the same screen: ISDN ports show green L1 Link and L2 Link, analogue ports show the port state and line voltage, LTE shows the SIM's network registration.
- Registration in the admin panel. Telephony → the “Operators” tab — the gateway's extension has a green dot.
- A call. Call the line or SIM number from a mobile — the operators of the group (or the operator) from the New destination field should ring.
- Audio — the
*43echo test. Registration says nothing about audio. Temporarily put*43into the rule's New destination, press activate and call the line: the PBX gives a short beep and then plays your voice back with a delay — talk for about ten seconds. You hear the beep and yourself — audio works both ways; the beep but not yourself — audio does not reach the PBX from the gateway; not even the beep — audio does not reach the gateway from the PBX. The test result appears in the call log. Afterwards put the group number back.
 Screenshot: beroNet wiki, “beroNet OS Web Interface (firmware 23.01)”, Management → State section.
If a rule does not fire as expected, Management → Dialplan Debug shows which rule the gateway will choose. Everything about checks — in the overview, section “How to check”.
Factory reset#
Before resetting a working gateway, save its configuration: Management → Backup and Restore (a .config.xml file; restoring on firmware older than the original may fail).
From the web interface — Management → Reboot/Reset → Factory Reset. The “Keep the following settings” boxes let you keep part of the configuration: network settings (Network), cloud (Cloud), SIP accounts (SIP), apps (Apps) and prefixes (Prefix). The settings of ISDN and analogue modules are always wiped. After modules are replaced, the gateway itself asks for such a reset.
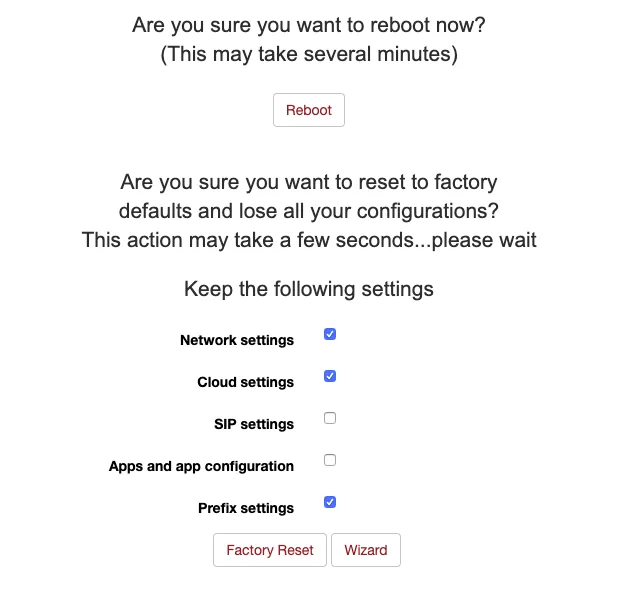 Screenshot: beroNet wiki, “beroNet OS Web Interface (firmware 23.01)”, Management → Reboot/Reset section.
beroNet gateways have no RESET button. If the password is lost or the gateway will not open, what remains is a hardware reset with a jumper on the PCM connector at the back:
- Switch off the power (take the PCIe card out of the computer).
- Find the PCM connector; if it cannot be reached from outside, open the case.
- Short two pins with a jumper: on current-generation gateways (Gateway V2 / SBC) — two pins vertically at the “Reset” mark; on the earlier boxes — the two rightmost pins vertically; on the PCIe card — horizontally.
- Switch on and wait up to 10 minutes (on firmware 17.01 and newer — at least 5 minutes). The gateway comes up on
10.0.0.2or on a DHCP address (find it with bfdetect). - Open it in the browser, then switch off the power and remove the jumper.
- Switch on again, press Firmware-Update and install the firmware again: a hardware reset wipes everything, including the firmware itself. Download the firmware from beroNet's site (the “beroNet OS Firmware” link in the documentation).
- Power-cycle — the gateway is in its factory state.
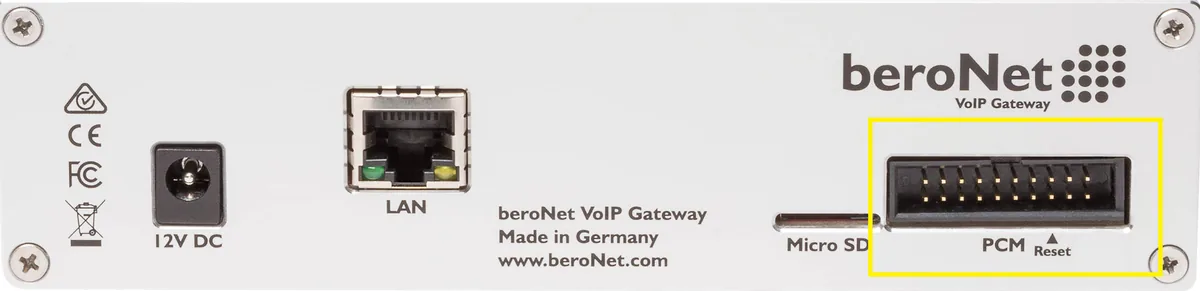 Photo: beroNet wiki, “How to do a Hardware Factory Reset (Gateway V2 / SBC — VoIP Gateway)”.
A hardware reset needs firmware newer than 1.12 and FPGA 3 or higher (on Gateway V2 / SBC — firmware 17.01-rc009 and FPGA 12 or higher).
What to do afterwards: the gateway again takes an address via DHCP (or 10.0.0.2), login admin / admin; start from step 1 and change the password. Resetting the gateway does not change the extension's login and password in the admin panel; if you no longer have the extension password, issue a new one with “Reset password”. General notes on resetting gateways — in the overview.
If the gateway does not register#
- Changes not applied. Without pressing activate after saving, the gateway keeps running the old settings.
- The server rejects the registration (red dot in SIP Status). The login
sip-…-<number>must be entered in full in both User and Authentification User; Secret must hold the latest password issued; the server address must be in SIP Outbound Proxy; SIP transport —udp; the Register box ticked. - Registration is green but the call goes nowhere. The Dialplan rule still has
\1in New destination, there is no rule from the line to SIP, or a more general rule above overrides it. - The call does not reach the gateway. The line is not up: on the State screen ISDN L1/L2 are not green (check TE/NT and PTP/PMP), FXO has the wrong country profile, LTE has no PIN or a forbidden carrier is selected. The port must belong to a port group.
- No audio or the call drops at once. Codecs no longer contain
alaw/ulaw, or DTMF is notRFC 2833— check the account's Media tab. - The web interface does not open. The gateway got a different DHCP address — find it with bfdetect; or the ACL in Preferences → Security blocks your computer.
General causes (SIP ALG on the router, UDP 5060 blocked) — in the overview, section “If the gateway does not register”; on the network — “Venue network, NAT and the SIM card”.
Models in the family#
A model name reads as “chassis + modules”: BNSBC-<M|L|XL> is the chassis (number of slots and channel ceiling), followed by the port set (-4BRI, -2E1, -4FXO, -2LTE4BRI…). SBCSB… is the non-expandable Small Business Line. SIP and Dialplan setup is the same for all; only the port pages under PSTN differ.
| Model | Ports / channels | Network / line | Setup differences |
|---|---|---|---|
| BNSBC-M / -L / -XL (chassis) | 2 / 3 / 3 slots; up to 16 / 64 / 128 channels; 2 Ethernet ports | any modules | the channel ceiling is hardware: a PRI E1 trunk (30 channels) does not fit in a BNSBC-M, you need a BNSBC-L |
| BNSBC-M-4BRI, BNSBC-L-4BRI | 4 BRI S0, 8 channels | ISDN BRI | TE/NT and PTP/PMP per port in software; free slots remain |
| BNSBC-M-8BRI | 8 BRI S0, 16 channels | ISDN BRI | replaces the BF4008S0Box; no free slots |
| BNSBC-M-2HYB | 2 BRI + 2 FXS | ISDN BRI + analogue phones | FXS ports are extensions, see “SIP phone setup” |
| BNSBC-M-1PRI, BNSBC-L-1PRI, BNSBC-L-2PRI | 1–2 PRI, 15–60 channels | ISDN PRI E1 (“PRI” modules also T1) | a 30-channel trunk only in the L chassis and above |
| BNSBC-L-1E1, BNSBC-L-2E1, BNSBC-XL-2E1 | 1–2 PRI, 30–60 channels | ISDN PRI, E1 only | same as PRI |
| BNSBC-M-4FXO, BNSBC-L-4FXO | 4 FXO (RJ-11) | analogue landline | country profile in PSTN → Hardware; CLIP field in the port group |
| BNSBC-M-2LTE / -4LTE / -6LTE (VoLTE SBC) | 2, 4 or 6 SIM | 2G / 3G / 4G VoLTE | PIN and SMS centre in LTE general; European bands (see FAQ) |
| Hybrids BNSBC-M-2LTE4FXO … BNSBC-L-4LTE1PRI | 2–4 SIM + FXO / FXS / BRI / PRI | line + SIM backup | two port groups and two Dialplan rules |
| SBCSB2S0 / SBCSB4S0 / SBCSB2HY / SBCSB4XO (Small Business Line) | 2–4 BRI, 2 BRI + 2 FXS or 4 FXO | ISDN BRI / analogue | not expandable; same web interface |
| BF400Box / BF1600Box / BF6400Box (berofix) | 2 slots; 16 / 64 / 128 channels; 1 Ethernet port | any modules | previous generation, no longer listed on the manufacturer's site; same firmware and interface, reset with the “old” jumper |
| BF400e / BF1600e / BF6400e (PCIe card) | 2 slots; 16 / 64 / 120 channels | same modules | goes into a computer, seen as a network card with its own IP; cannot be turned into a box |
The earlier mobile module BNMO-2GSM (2 GSM ports) is no longer in the manufacturer's current lists — for new installations it is the VoLTE SBC. SIP-to-SIP session licences (BNSBC-SESSION-*) are for SBC mode and have nothing to do with connecting the gateway as an extension.
FAQ#
Can I call out from the PBX through this gateway?#
Not yet — with us the gateway handles incoming calls only. beroNet itself can place outgoing calls (a Dialplan rule from SIP to a port group), but our PBX does not yet send calls to a gateway extension as to a line. For outgoing calls from your own number use a SIP provider.
I have ISDN with several numbers — can I route them to different groups?#
Yes, on the gateway side: create one Dialplan rule per number — in Destination a pattern matching that number, in New destination the number of the ring group you want. Put specific rules above the general (.*) rule. How the carrier sends the number (in full or only the last digits) can be seen in Management → Dialplan Debug and on the active calls screen.
I forgot the password and there is no reset button on the case. What now?#
The manufacturer publishes no other way than the hardware reset with a jumper on the PCM connector. After it you have to install the firmware again — see “Factory reset”. So keep the new password safe and make a configuration backup.
Do I need G.722?#
No. G.722 is not listed in beroNet's specifications; our PBX works fine with G.711 (A-law and µ-law), which every model has.
Will a VoLTE SBC work with a SIM card outside Europe?#
Check the carrier's bands. The VoLTE SBC has a European set: 2G — B3, B8; 3G — B1, B8; 4G — B1, B3, B7, B8, B20. There are no American bands, no Australian B28 and no Asian B40/B41. Where 2G and 3G are switched off, only the 4G part works. Whether a SIM may be used in a gateway in your country — see “By country”.
The beroNet wiki says not to tick Register for Asterisk. Why is it different here?#
That article describes a PBX where the gateway is configured by hand by IP address. Our PBX does not know the gateway's address and expects it to register by itself, like a phone — so Register is needed, as in beroNet's guide for 3CX.
Sources#
beroNet documents, accessed 10.09.2026:
- beroNet OS Web Interface (firmware 23.01) — https://beronet.atlassian.net/wiki/spaces/PUB/pages/3457843201/beroNet+OS+Web+Interface+firmware+23.01
- How to configure a beroNet Gateway with 3CX V20 — https://beronet.atlassian.net/wiki/spaces/PUB/pages/3943530497/How+to+configure+a+beroNet+Gateway+with+3CX+V20
- Understanding the beroNet Dialplan — https://beronet.atlassian.net/wiki/spaces/PUB/pages/17006612/Understanding+the+beroNet+Dialplan
- Call routing if more than one GSM SIM cards are used — https://beronet.atlassian.net/wiki/spaces/PUB/pages/94180613/Call+routing+if+more+than+one+GSM+SIM+cards+are+used
- SIP configuration of a beroNet VoIP Gateway — https://beronet.atlassian.net/wiki/spaces/PUB/pages/79527952/SIP+configuration+of+a+beroNet+VoIP+Gateway
- How to modify what goes into From/P-Preferred-Identity/Callerid — https://beronet.atlassian.net/wiki/spaces/PUB/pages/69206138/How+to+modify+what+goes+into+From+P-Preferred-Identity+Callerid+and+so+on
- Network Setup — Gateways & Cards — https://beronet.atlassian.net/wiki/spaces/PUB/pages/59211824/Network+Setup+-+Gateways+Cards
- BFdetect: control the IP of your beroNet VoIP devices — https://beronet.atlassian.net/wiki/spaces/PUB/pages/75726884/BFdetect+control+the+IP+of+your+beroNet+VoIP+devices
- FXO configuration — https://beronet.atlassian.net/wiki/spaces/PUB/pages/84770921/FXO+configuration
- GSM configuration — https://beronet.atlassian.net/wiki/spaces/PUB/pages/79528028/GSM+configuration
- LTE Module Provider Selection — https://beronet.atlassian.net/wiki/spaces/PUB/pages/4211212294/LTE+Module+Provider+Selection
- How to do a Hardware Factory Reset (Gateway and VoIP Card) — https://beronet.atlassian.net/wiki/spaces/PUB/pages/69206121/How+to+do+a+Hardware+Factory+Reset+Gateway+and+VoIP+Card
- How to do a Hardware Factory Reset (Gateway V2 / SBC — VoIP Gateway) — https://beronet.atlassian.net/wiki/spaces/PUB/pages/92900393/How+to+do+a+Hardware+Factory+Reset+Gateway+V2+SBC+-+VoIP+Gateway
- Security Issues — https://beronet.atlassian.net/wiki/spaces/PUB/pages/88768529/Security+Issues
- Physical Setup — Gateways & Cards — https://beronet.atlassian.net/wiki/spaces/PUB/pages/59211827/Physical+Setup+-+Gateways+Cards
- Brochure: SBC VoIP Gateway next Generation (02.2023) — https://www.beronet.com/wp-content/uploads/2023/02/beroNet_Brochure_SBC-VoIP-Gateway_nextGeneration.pdf
- Brochure: VoLTE SBC (08.2019) — https://www.beronet.com/wp-content/uploads/2019/08/beroNet_Brochure_VoLTE-SBC.pdf
- Brochure: ISDN Gateways (03.2019) — https://www.beronet.com/wp-content/uploads/2019/03/beroNet_Brochure_ISDN-Gateways.pdf
- Brochure: PCIe VoIP Cards (03.2019) — https://www.beronet.com/wp-content/uploads/2019/03/beroNet_Brochure_PCIe-VoIP-Cards.pdf
- Product pages: Session Border Controller — https://www.beronet.com/gateway/session-border-controller/ · VoLTE SBC — https://www.beronet.com/gateway/volte-sbc/ · Small Business Line — https://www.beronet.com/gateway/small-business-line-voip-gateway/ · 4 FXO — https://www.beronet.com/gateway/4-fxo-gateway/