Yeastar TA FXO (TA410/810/1610) — setup for our PBX
The venue has a landline number on an ordinary analog line — that RJ-11 socket from the telecom operator, the number on your sign that guests have been calling for years. Moving it to a SIP provider is either unwanted or impossible, yet you would like to receive those calls in the PBX: on your staff, with recording and distribution across ring groups. The box that sits between the line and your network is an FXO gateway: landlines plug into its ports, and it converts them to SIP.
The Yeastar TA line with FXO ports consists of the TA410 (4 lines), the TA810 (8 lines) and the rack-mounted TA1610 (16 lines). Do not confuse it with the FXS gateways of the same TA series (TA100…TA3200): those take analog telephones and are configured differently — they have their own page.
Credentials, network rules and limits common to every gateway are on the overview page “A GSM gateway, landline or ISDN in your PBX”.
What you will need#
- Extension credentials from the admin panel — as a rule one set for the whole gateway: SIP server, extension number, login, password, port
5060, transportUDP. Where to get them — “Extension credentials for the gateway” (Telephony → Operators → “Reset password”). Create a separate operator for the gateway with a clear name (“Landline, front desk”) instead of handing it a live employee's account. - The number the gateway will dial inside the PBX — a ring group number (Telephony → “Ring groups”, numbers from 700) or an operator's extension number. You will need it in step 4, so write it down in advance.
- The landline from your operator, plugged into an
FXOport of the gateway with anRJ-11cable. On the TA1610 the lines go either into theRJ-11sockets on the front panel or into theRJ-21connector at the back. - The gateway on the venue network — a cable into the
LANport. On the TA410/TA810 the second port is labelledWANand is described in the documentation as “Reserved” — do not use it. - A computer with a browser on the same network.
- The country of your line — you will need it in the “Tune the lines” section: the factory settings of the gateway are made for the United States.
Step 1. Find the gateway's IP address#
Yeastar FXO gateways have no voice menu. The “pick up the handset and dial ***” trick works only on the FXS models: no telephone plugs into an FXO port. The address is found differently, and it depends on the model.
- The TA410 and TA810 (firmware 41.19.0.23 and newer) ship with a static address of
192.168.5.150, mask255.255.255.0. To reach it, temporarily give your computer an address on the same network —192.168.5.10with mask255.255.255.0, for instance. - The TA1610 V3 takes its address over DHCP according to its manual — plug it into a network with a working DHCP server and look up the address it was given in the router's client list (search by the MAC address printed on the label underneath).
- The vendor's utility. The TA Series FAQ page hosts the
FindTA.rararchive with a Windows tool calledDeviceFound.exe: it finds the gateway on the network by MAC address or serial number and shows its IP.
The indicators tell you what is going on: a blinking RUN means the system has booted and is healthy; an FXO port indicator that is lit means the line is connected, one that blinks means there is no line. On the TA410 the indicators of ports 5–8 are not used.
Step 2. Log in to the web interface#
Open http://<gateway IP> in a browser (plain HTTP on port 80; HTTPS is off from the factory and is enabled under System → Network Preferences → Service).
The factory login and password are admin / password — the same on the TA410, TA810, TA1610 and TA3210.
Change the password straight away: System → System Preferences → Password Settings — the old password, then the new one twice. After saving, the gateway throws you back to the login page; sign in with the new password. If you get the password wrong five times in a row, the gateway blocks your IP address for 10 minutes — that is built-in protection (Security Center → Alert Settings), not a fault: wait and log in again.
While you are here, decide whether the gateway stays on its factory address. A permanent address is more convenient: System → Network Preferences → LAN Settings — set a static address from your venue network (or keep DHCP and reserve the lease on the router).
Step 3. Enter the PBX credentials#
On a Yeastar FXO gateway the SIP side is a trunk, not an account per port. One trunk = one of our extensions, and all the lines are fed into it by a route (step 4).
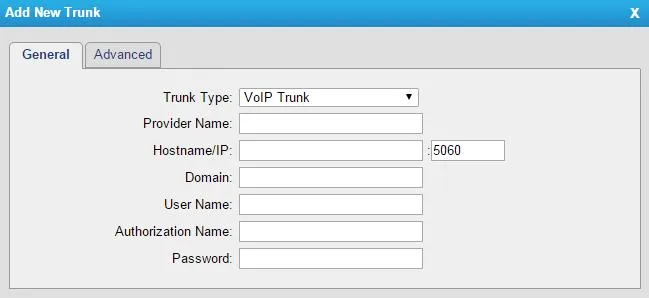
Open Gateway → VoIP Settings → VoIP Trunk → Add New Trunk. The Trunk Type field offers three options, and exactly one of them suits us:
| Trunk Type | What it is | Suits us |
|---|---|---|
| Account | an account on the gateway itself, so that a PBX registers to it | no — our PBX never registers anywhere |
| VoIP Trunk | the gateway registers to an external SIP server with a login and password | yes, this is our mode |
| Service Provider | an IP-address peer with no registration | no — the gateway must register with us |
Screenshot: TA410/810 User Manual (version 41.19.0.31), p. 17.
Fill in the General tab with the values from the “Extension credentials” window:
| Field in the admin panel | Value | Field in the gateway |
|---|---|---|
| — | VoIP Trunk |
Trunk Type |
| — | a short Latin name, up to 15 characters (cenaly, for example) |
Provider Name — the trunk appears under it in routes |
| SIP server | the address of our PBX | Hostname/IP |
| Port | 5060 |
the field to the right of Hostname/IP |
| SIP server | the same address | Domain |
| Login | sip-…-<number> — in full, not just the number |
User Name |
| Login | the same string in full | Authorization Name |
| Password | the extension password (shown once) | Password |
| Transport | UDP |
Transport on the Advanced tab |
| Extension number | — | not entered anywhere; it only tells you which extension the gateway occupies |
Press Save, and then — this is mandatory — Apply Changes in the top right corner. Without that button the settings are stored but not active: it is the single most common reason for “I entered everything and nothing works”.
Fine settings: NAT, codecs, DTMF, calls dropping every 15 minutes
The global SIP parameters live under Gateway → VoIP Settings → SIP Settings, and the vendor advises leaving the defaults alone. Four things are worth a look:
- Codecs — G.711 A-law and µ-law must come first, G.722 may follow. Our PBX does not use G.729 (and Yeastar licenses it separately anyway).
- DTMF Mode — the factory value
rfc2833matches our PBX, no change needed. - NAT — for a gateway behind an ordinary router the defaults are enough, and STUN is not required. On the router, turn SIP ALG off: it breaks both registration and audio.
- Session-timers on the Advanced tab — if conversations drop after exactly 15 minutes, the vendor recommends disabling this parameter.
On the trunk's own Advanced tab leave From User and Realm empty, and keep Enable SRTP and Enable Outbound Proxy Server off: we have neither SRTP nor a separate proxy. If the Keep Alive Type field is available, the Options value helps keep the registration alive through a router.
Need to tell the lines apart in the PBX? Then create several extensions and several VoIP Trunk trunks — one per line — and make a separate route per port in step 4. The standard and simpler option is one trunk for all the lines.
Step 4. Send incoming calls to the PBX#
Now tell the gateway what to do with a call arriving on the landline: seize the trunk and dial a number inside our PBX.
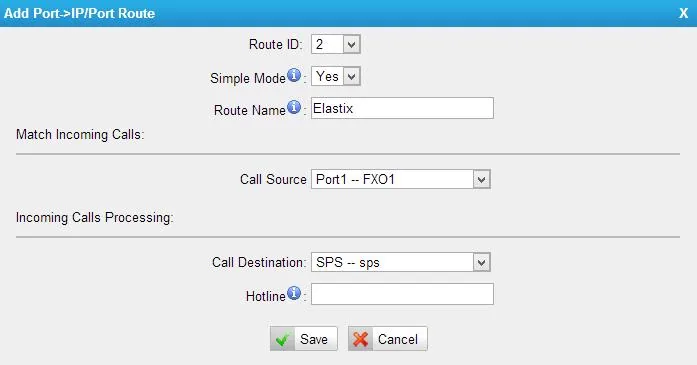
Gateway → Route Settings → Port->IP/Port → Add Port->IP/Port Route:
| Field | Value |
|---|---|
| Simple Mode | Yes |
| Route Name | any name that makes sense to you |
| Call Source | the port you need (Port1 -- FXO1) or a Port Group with all the lines at once |
| Call Destination | your VoIP Trunk from step 3 |
| Hotline | the ring group number (from 700) or an operator's extension number |
Screenshot: TA410/810 User Manual (version 41.19.0.31), p. 28.
The Hotline field is the most important thing on this page. It is what turns the gateway into a direct wire to your ring group: the vendor states that the Hotline number is sent to the PBX “as a DID number”, meaning the call lands on that number immediately. If Hotline is left empty, the gateway falls back to two-stage dialling: the calling guest hears the gateway's own dial tone and is expected to dial an extension themselves — in practice they will just hang up.
Save the route (Save) and press Apply Changes again.
If you want different lines to reach different groups, make one Simple Mode route per port: that is easier than working out the filters of Detail Mode.
The caller's number. The gateway does detect the caller ID on the analog line (the settings are in the section on lines below), but the vendor's documentation does not say whether it passes that number into the SIP call over the trunk. Expect that a call may appear in the operator panel as a call from the gateway's extension; in any case, do not fill in the From User field on the trunk's Advanced tab — if it is filled in, it will certainly replace the caller's number.
About outgoing calls — honestly. Calling out of the PBX through this gateway's landline is not possible right now: to our PBX the gateway is an extension, and the outgoing rule can only send a call to a SIP provider's line. The gateway itself can do it (the IP->Port route in the opposite direction), but the PBX side does not support it yet — see “Outgoing calls through the gateway — not yet”. Today an FXO gateway is a way to receive calls on a landline number; for outgoing calls use a SIP provider's number.
Step 5. Check registration and a call#
- Registration in the gateway. Open Status → System Status → Port/Trunk Status, the VoIP Trunk Status block. You need the status
Registered. What the others mean:Request Sent— registration is still under way, wait;Waiting for Authentication— the login or the password is wrong;Unregistered— the gateway could not reach the server. - Registration in the admin panel. A green dot must light up next to the gateway's extension in the “Operators” tab.
- Line state. Under Status → System Status the FXO port must read
Idle, notDisconnect:Disconnectmeans the operator's line is not plugged into the port, or there is no voltage on it. - A call. Call the landline number from a mobile phone — the ring group or operator named in Hotline must ring. Then hang up on the mobile: the call must end for the operator within seconds. If the operator keeps hearing a busy tone and the call “hangs”, move on to the next section — the problem is hangup detection.
- Audio — the
*43echo test. Registration says nothing about audio: it travels as a separate stream. Temporarily set Hotline to*43, press Apply Changes and call the landline number: the PBX answers, gives a short tone and starts playing your own voice back to you with a slight delay. If you hear yourself, audio works in both directions. If you hear the tone but not yourself, audio is not reaching the PBX from the gateway. If there is not even a tone, it is not reaching the gateway from the PBX. When you are done, put the ring group number back into Hotline and press Apply Changes once more.
Tune the lines for your country#
The factory settings of the FXO ports are made for the United States — on a line in any other country they need adjusting, otherwise the gateway will not recognise the local tones. This is a mandatory step, not fine tuning: it is exactly why calls “hang” after the guest has hung up.
- Gateway → Gateway Settings → General Preferences → FXO Mode — pick your country. The factory value is
FCC; this parameter sets the on-hook speed, impedance and ringer thresholds to match the line characteristics of your country. - Gateway → Advanced Settings → Tone Zone Settings — your country again. It determines which tones (busy, ringing, congestion) the gateway recognises and generates.
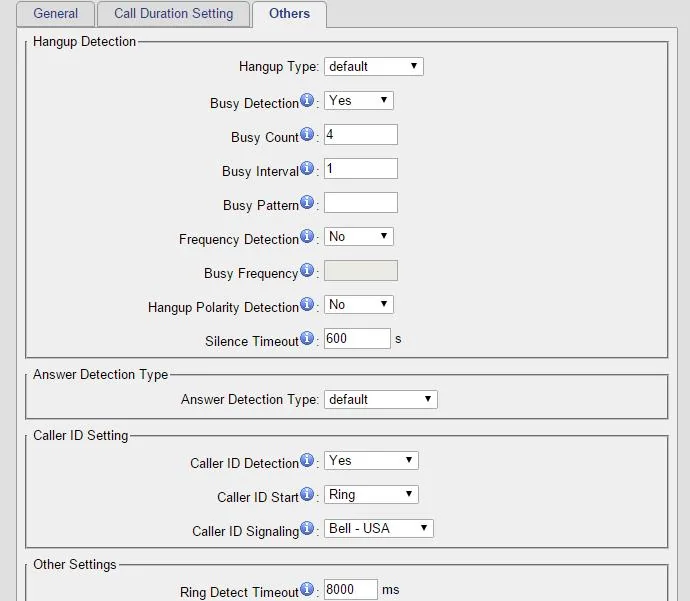
- Gateway → Port List → Port List → Edit on the port you need, the Others tab — hangup and caller ID detection.
Screenshot: TA410/810 User Manual (version 41.19.0.31), p. 13.
- Leave Busy Detection at
Yes. Busy Count is4from the factory; the vendor explicitly notes that 6 or 8 usually gives better results — if hangups are caught only half the time, raise the value. - Enable Hangup Polarity Detection if your operator applies a polarity reversal on the line at hangup: that is the most reliable signal of all. Ask the line operator whether the service is available.
- Silence Timeout (600 seconds by default) is the last-resort safety net: that is how long the gateway holds a call in complete silence.
- Caller ID Signaling is the format in which the caller's number arrives:
Bell - USAfrom the factory, usuallyV23-UKfor Europe and theV23-Japanvariants for Japan. If the number is not detected, first ask your operator whether caller ID is enabled on the line, and only then try other formats.
Factory reset#
A reset is what you need if the web interface password has been forgotten, the gateway arrived from a previous owner with someone else's settings, or the configuration has become hopelessly tangled.
With the button on the case. The Reset button is on the back panel of the TA410/TA810 and on the front panel of the TA1610 V3. With the power on, press and hold it for 7 seconds. ⚠️ Do not hold it any longer: the vendor warns that a long press will “break down the system”. Wait for the reboot — the blinking RUN indicator tells you it is ready.
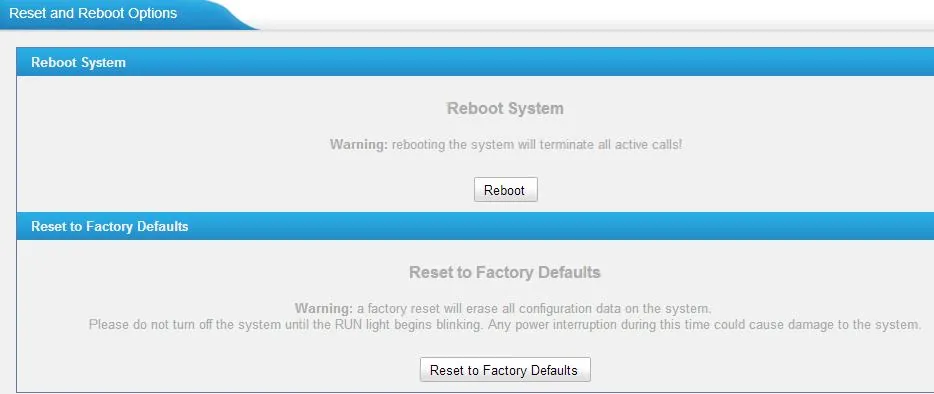
From the web interface. System → System Preferences → Reset and Reboot → the Reset to Factory Defaults button. The plain Reboot lives on the same page and is not a reset. Do not cut the power until the RUN indicator starts blinking again: an interruption at that moment can damage the gateway. A third route is the Reset configuration to Factory Defaults checkbox during a firmware upgrade (System → System Preferences → Firmware Update).
Screenshot: TA410/810 User Manual (version 41.19.0.31), p. 57.
What is erased: the entire configuration — the trunk with the extension credentials, the incoming routes, the port and line settings, the network settings and the web interface password. The firmware stays exactly as it was.
What to do afterwards: the TA410/TA810 answer on 192.168.5.150 again, the TA1610 V3 takes an address over DHCP; the login is admin / password. Then repeat steps 2–5 of this page. The extension password has to be issued anew: the admin panel shows it once, so go to Telephony → Operators → “Reset password”. If you made a backup before the reset (System → System Preferences → Backup and Restore), you can restore it — but only onto the same or a newer firmware, a backup from an older version will not load onto a newer one.
If the gateway does not register#
- The wrong trunk type is selected.
Service ProviderandAccountwill not work with us — you need VoIP Trunk with registration. - The login was not entered in full. User Name and Authorization Name take the whole
sip-…-<number>string, not the extension number. TheWaiting for Authenticationstatus is almost always this or a wrong password. - Apply Changes was not pressed. Save stores the settings; only Apply Changes in the top right corner applies them.
- The instructions were for another model. The “VoIP Server Settings” and “Port Register” items and the
***voice menu found all over the internet belong to the FXS gateways of the TA series or to FXO firmware older than 41.19.0.15. Today's firmware has none of them — it has VoIP Trunk and Port->IP/Port routes. - The trunk name is longer than 15 characters. On older firmware this broke routing with port groups; keep Provider Name short.
- SIP ALG on the router — turn it off and restart the gateway.
- Registered, but no calls arrive — an empty Hotline field or a non-existent number in it. Check that the number can be dialled from any phone on the PBX.
Causes that have nothing to do with the brand are in the “If the gateway does not register” section of the overview page.
Models in the family#
| Model | FXO lines | Network and case | Firmware | Differences in setup |
|---|---|---|---|---|
| TA410 | 4 (RJ-11) |
1× LAN 10/100, desktop/wall-mount, 12 V power | 41.19.0.53 (2026-06-02) | factory address 192.168.5.150; port indicators 5–8 unused; the WAN port is reserved |
| TA810 | 8 (RJ-11) |
1× LAN 10/100, same case | 41.19.0.53 | web interface and setup identical to the TA410 |
| TA1610 V3 | 16 (RJ-11 in front + RJ-21 at the back) |
LAN + WAN 10/100, 1U rack, mains power, grounding terminal | 48.0.0.31 (2026-07-27) | address over DHCP rather than static; grounding is mandatory; the Reset button is on the front panel |
| TA1610 V2 | 16 | 1U rack | 40.19.0.23 (last one) | end of sale on 2019-06-13, end of life on 2024-06-13. V3 firmware must never be flashed onto it — the gateway will be destroyed |
The TA2410 and TA3210 — where they stand
The TA series datasheet lists two more rack-mounted models: the TA2410 (24 lines) and the TA3210 (32 lines). Neither appears on Yeastar's product page or firmware page at the moment, so before buying, check with your supplier whether they are still shipped and whether recent firmware exists. The TA3210's web interface is the same — VoIP Trunk plus Port->IP/Port routes — so this whole page applies to it; only the port menu differs (Gateway → Port List → FXO Port List instead of Port List).
FAQ#
How many extensions does a gateway with 8 lines need?#
One, normally: the VoIP Trunk registers with a single extension, and all the lines are fed into it by a route with a port group. Several extensions (one per trunk) are only needed if you want to tell the lines apart in the PBX — to see calls to the delivery number separately from calls to the booking number, for instance.
Can I call out through the landline using the PBX?#
Not yet. Through this gateway our PBX can only receive calls from the line; outgoing calls go through a SIP provider's number. For details, see “Outgoing calls through the gateway”.
The call arrives but does not end when the guest hangs up#
This is the single most common problem with FXO gateways, and it is fixed in the gateway rather than the PBX: hangup detection has not been set for your country. Work through “Tune the lines for your country” — FXO Mode, Tone Zone Settings, Busy Count at 6 or 8, and Hangup Polarity Detection where the operator supports it.
Can I receive faxes through this gateway?#
Not reliably. The FXO gateways of the TA series support only T.30 (the fax travels as ordinary audio) and have no T.38. Over the internet such a fax breaks at the slightest packet loss; if faxes matter to you, keep a separate line with a real fax machine on it.
Does the gateway need a public IP address or port forwarding on the router?#
No. The gateway connects to our PBX itself and keeps the registration up — ordinary internet access is enough. Its web interface should not be exposed to the internet, and doing so is unsafe: change the factory password right after setup.
Do I have to upgrade the firmware?#
Not necessarily, but it helps: recent versions fixed registration drops among other things. The current versions are 41.19.0.53 for the TA410/TA810 and 48.0.0.31 for the TA1610 V3, both on the Yeastar firmware page. One rule matters above all: TA1610 V2 and V3 firmware are incompatible — a V3 image on V2 hardware destroys the gateway.
Sources#
Manufacturer documentation, accessed on 2026-09-10.
- TA410/810 User Manual (version 41.19.0.31, revised 2024-12-11) — the web interface, VoIP Trunk, Port->IP/Port routes, FXO port settings, Reset and Reboot, trunk statuses. The source of every screenshot on this page.
- TA410/810 FXO VoIP Gateway Installation Guide (2025-01-20) — the Reset button and its 7 seconds, the indicators, the ports on the case.
- TA1610 V3 FXO Gateway User Manual (version 48.0.0.20) — how the rack-mounted model differs.
- TA1610 V3 Installation Guide — the RJ-21 connector, grounding, the Reset button.
- TA3210 FXO Gateway User Manual — the trunk's Advanced tab: Transport, DTMF, codecs, From User.
- Yeastar TA FXO Gateway Integration Guide — P-Series Appliance Edition (2024-07-08) — the Hotline field and passing the number to the PBX as a DID.
- Interconnect Yeastar Cloud PBX and TA FXO Gateway — a register-based trunk and the incoming route.
- TA Series FAQ — the DeviceFound utility, the factory
admin/password, the voice menu being FXS-only, the absence of T.38. - Release Notes for TA410/TA810 41.19.0.X — the static factory address since 41.19.0.23 and the interface change in 41.19.0.15.
- Yeastar TA Series Analog VoIP Gateways Datasheet — ports, codecs, caller ID and hangup detection, the composition of the series.
- Firmware download and the End-of-Sale and End-of-Life Policy — current firmware versions and the end-of-sale and end-of-life dates of the TA1610 V2.