Grandstream GXW4501/4502/4504 (E1/T1/J1) — setup for our PBX
GXW4501, GXW4502 and GXW4504 are Grandstream's rack-mount digital gateways. Their RJ45 ports take a digital E1, T1 or J1 trunk — from a telecom operator or from an old office PBX — and the gateway converts it to SIP. The models differ only in the number of ports: 1, 2 or 4 trunks, that is up to 30, 60 or 120 simultaneous calls. The trunk type and signalling (ISDN PRI, SS7, MFC R2) are chosen in the web interface; the hardware is the same worldwide.
This is equipment for venues that already have a paid-for trunk: a hotel with a block of numbers, a factory canteen, a shopping mall, a restaurant chain with an old E1 PBX. For a café with one or two landline numbers it is overkill — an FXO gateway or a SIP provider number will do (“Connecting a provider number to the PBX”). The family is discontinued: the manufacturer lists it as End-Of-Life, the last firmware is 1.0.1.13 of 2024-06-20, and there will be no further updates. A gateway you already have is set up in the normal way, but buying a new one for our PBX makes no sense.
To our PBX the gateway is just another extension: it registers on the PBX server with a single SIP trunk, and dials an incoming call from the trunk through to a ring group or an operator by itself. What is the same for all gateways (credentials, where to send incoming calls, network, limitations) is in the overview “GSM gateway, landline or ISDN in your PBX”. This page is the step-by-step guide for the Grandstream GXW450X, with screens from the manufacturer's documentation.
The GXW450X setup order is always the same: the line (Gateway Settings → Interface Settings → Digital Hardware) → a digital trunk (Trunks → Digital Trunks) → a SIP trunk to our PBX (Trunks → VoIP Trunks) → routes (Trunks → Inbound Routes and Outbound Routes). The Save button only stores your input — settings take effect after Apply Changes in the top-right corner.
What you need#
- Extension credentials from the admin panel: Telephony → Operators → create an operator for the gateway (for example, “E1 gateway, landline numbers”) → “Reset password” → the “Extension credentials” window: SIP server, Extension number, Login, Password, Port
5060, TransportUDP. One set is enough for the whole gateway: all channels of the trunk reach the PBX through one SIP trunk. If you have several E1 trunks and want to tell them apart in the PBX, you can create a SIP trunk (and an extension) per E1 trunk. The password is shown once, so copy it into the gateway right away. Details — “Extension credentials for the gateway”. - The number the gateway will dial inside the PBX — a ring group number (Telephony → “Ring groups”, numbers from 700) or an operator's extension number. You will need it in step 4.
- The landline numbers (DIDs) of your trunk — in full, exactly as the operator delivers them. The gateway will select calls by them.
- Trunk parameters from the operator: type (E1, T1 or J1), signalling (usually ISDN PRI), line coding, framing and CRC4. Without them the trunk will not come up.
- The gateway on your venue network: a cable into the WAN port, the operator's cable into an E1/T1/J1 port, power — a 12 V / 2 A adapter.
- A computer with a browser on the same network.
Step 1. Find the gateway's IP address#
Out of the box the WAN port gets its address via DHCP, and there is no need to guess it: the gateway has a display.
- On the display's idle screen. After boot the screen shows the device information; once the gateway is connected to the network, the network LED turns green and the IP address appears on the display.
- Through the display menu. The OK button opens the menu, DOWN scrolls through items, OK selects, the Back item goes back. The item you need is Network Info: it shows LAN Mode (DHCP, Static IP or PPPoE), LAN IP and the subnet mask. Web Info shows the web interface protocol and port, Device Info — the MAC address and versions. After 20 seconds of inactivity the menu returns to the idle screen.
- No DHCP on the network. The factory static address is
192.168.0.160, mask255.255.0.0. You can change the addressing mode right from the display: Network Menu → LAN Mode.
The LAN port and network modes
The gateway's network settings (Network Settings → Basic Settings → Method) have two modes. In Route mode the WAN port faces the venue network and the LAN port is a separate socket for a computer with its own DHCP server: the gateway's address on that side is 192.168.2.1, and the computer gets an address from the 192.168.2.100–192.168.2.254 pool. In Switch mode both ports are simply the venue network.
Step 2. Log in to the web interface#
Open https://<gateway IP>:8089 in a browser — the interface runs over HTTPS on port 8089. A plain http://<IP> opens only because redirection from port 80 is enabled at the factory (System Settings → HTTP Server → Redirect From Port 80); if someone has turned it off, the address without :8089 “will not open”.
| What | Value |
|---|---|
| Login | admin |
| Password | unique to each device, printed on the sticker on the case — not admin |
| First login | you must change the password and enter an e-mail; then the initial setup wizard starts (network, time zone, trunks and routes) — these are the same settings as on this page |
| Sticker worn off | display → Factory Menu → Default Password shows the factory password — but only until it has been changed: after that the item disappears |
| Forgot the new password | recovery to the e-mail entered at first login (System Settings → Email Settings), otherwise — factory reset |
Accounts and their passwords later live in Maintenance → User Management. The web interface is available in 11 languages, but this page uses the English item names, as in the manufacturer's documentation.
⚠️ Firmware. Versions below 1.0.0.35 must not be used — they carry a vulnerability fixed in 1.0.0.35. After a firmware upgrade the manufacturer requires you to change the passwords of all web interface accounts. The firmware file is gxw4500fw.bin, uploaded in Maintenance → Upgrade.
Step 3. Enter the PBX credentials#
The GXW450X has no “account per port” like analogue gateways. The network side consists of SIP trunks, the line side of digital trunks, and routes tie them together (step 4). We need a SIP trunk of type Register SIP Trunk: with it the gateway registers on our PBX with the extension's login and password. The Peer SIP Trunk type (an IP link without registration) does not suit us: the PBX does not connect to the gateway and does not know its address.
Trunks → VoIP Trunks → Add SIP Trunk:
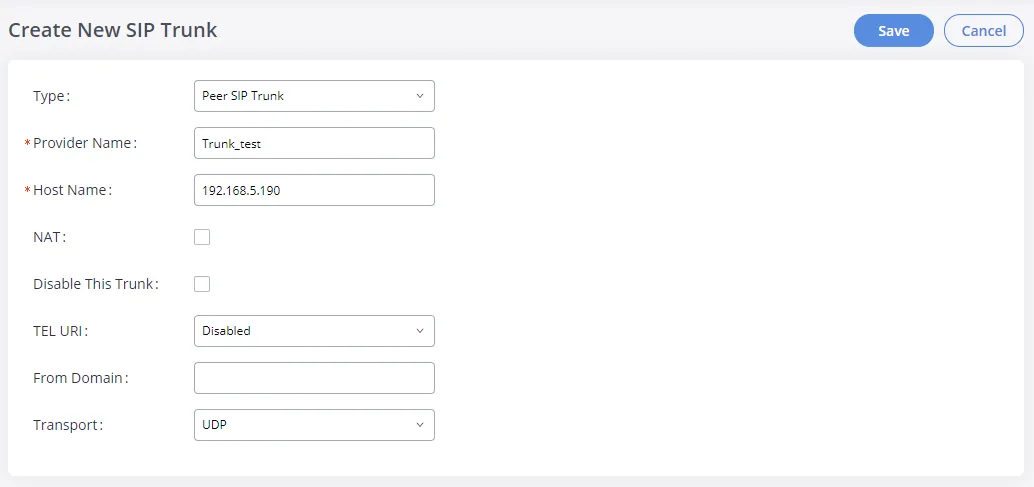
Screenshot: Interconnecting UCM6xxx with GXW450x Gateway, Grandstream documentation (accessed 2026-09-10); the manufacturer's example uses the Peer SIP Trunk type — for our PBX choose Register SIP Trunk, and the Username, Password, AuthID and From User fields will appear.
| Field in the “Extension credentials” window | Value | Where it goes in the gateway |
|---|---|---|
| — | Register SIP Trunk |
Type |
| Extension number | a label for yourself | Provider Name — for example, ATS-7001 (routes refer to the trunk by this name) |
| SIP server | our PBX address | Host Name; leave From Domain empty — the gateway will use the Host Name |
| Port | 5060 |
there is no separate field — 5060 is the default; if you like, enter the address as server:5060 |
| Transport | UDP |
Transport (factory value — UDP) |
| Login | sip-…-<number> — in full, not just the extension number |
Username |
| Login | the same full string | AuthID |
| Login | the same full string | From User — required, see below |
| Password | the extension password (shown once) | Password |
| — | Yes |
Need Registration (factory value) |
Why From User matters. The GXW450X is a trunk: in the From header of a call it sends to the PBX it may put the caller's number from the line. Our PBX recognises its extension by the login and will not accept a call with somebody else's number in From. According to the manufacturer's documentation, the From User field is exactly what overrides the From header — put the full login there, and calls from the line will be recognised.
Click Save, then the ✎ icon next to the new trunk — the full set of parameters opens. On the Advanced Settings tab:
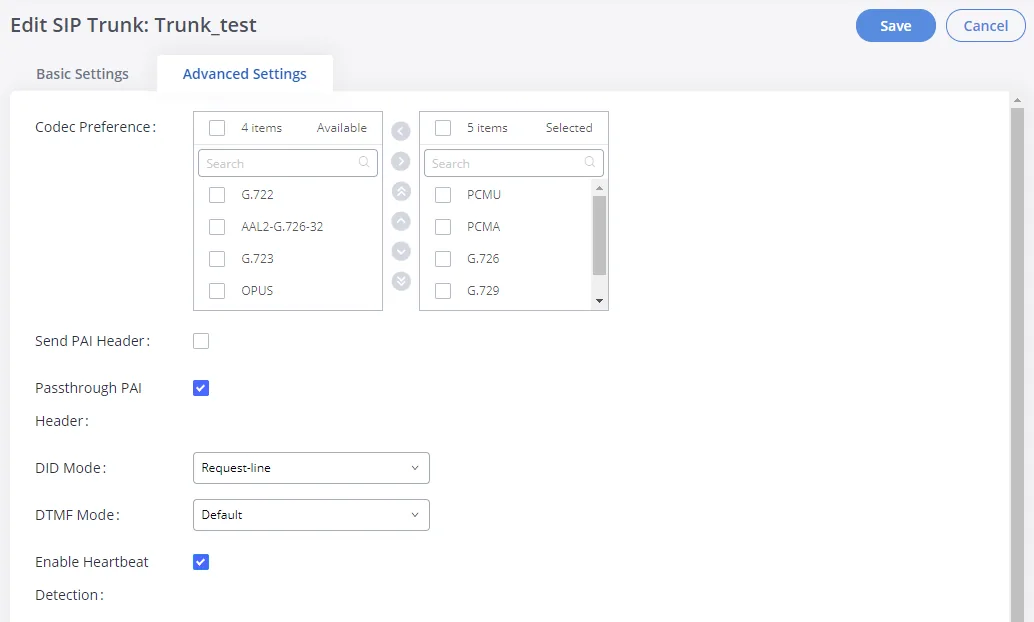
Screenshot: Interconnecting UCM6xxx with GXW450x Gateway, Grandstream documentation (accessed 2026-09-10).
- Codec Preference — keep only PCMA, PCMU and G.722 in the “Selected” column. Our PBX does not use G.726, G.729, iLBC, G.723, AAL2-G.726-32 or OPUS — remove them so the gateway does not offer a codec it cannot agree on with the PBX.
- DTMF Mode = RFC2833.
- Enable Heartbeat Detection — turn it on: the gateway will check the link to the PBX with a SIP OPTIONS request every 60 seconds, and the Dashboard will show an honest trunk status.
- SRTP = Disabled (factory value). Our PBX has no voice encryption: the “Enabled and forced” value will break calls.
Click Save, then Apply Changes.
NAT, ports and the other trunk parameters
- NAT. If the gateway sits behind the venue router, tick NAT in the trunk. No port forwarding is needed — the gateway keeps the registration itself. On the router, turn off SIP ALG. For static NAT there is Gateway Settings → SIP Settings → NAT (
External Host,Local Network Address) — usually not needed. - Outbound Proxy Support / Outbound Proxy — leave off and empty: our PBX has no separate proxy.
- Global SIP settings (Gateway Settings → SIP Settings) need no changes: Bind UDP Port =
5060— the port the gateway itself listens on; Register Timeout = 20 s — the pause before re-registering; Register Attempts =0— retry forever; TCP and TLS are off at the factory. - Voice — Gateway Settings → RTP Settings, the factory range
10000–20000needs no changes. - Maximum Number of Call Lines — a cap on simultaneous calls through the trunk (
0— unlimited), if you want to limit the load. - A registration failure is logged as the Register SIP trunk failed event (Maintenance → System Events → Alert Events), and the gateway can e-mail you about it.
Step 4. Send incoming calls to the PBX#
Now tell the gateway what to do with a call from the line: send it over our SIP trunk and dial a number inside our PBX — a ring group or an operator. The GXW450X needs two rules for that: an inbound one (which calls from the line to accept) and an outbound one towards the PBX (where to send them and which number to dial). This is exactly how the scheme is described in the manufacturer's guide on connecting the GXW450X to an IP PBX.
The line first. If the operator or a previous installer has not configured it yet: Gateway Settings → Interface Settings → Digital Hardware — port type (E1, T1 or J1), signalling and the channel group (by default it includes all voice channels: 30 on E1, 23 on T1/J1 — splitting them into several groups is usually pointless). Then Trunks → Digital Trunks → create a trunk on this group, for example Digital_1. Line parameters are in the block below.
Rule 1 — accept the call from the line. Trunks → Inbound Routes → Add: Trunks = your digital trunk (Digital_1), Pattern = the landline number with a leading underscore — _0612345678 in the manufacturer's example. The pattern _X. means “any number”.
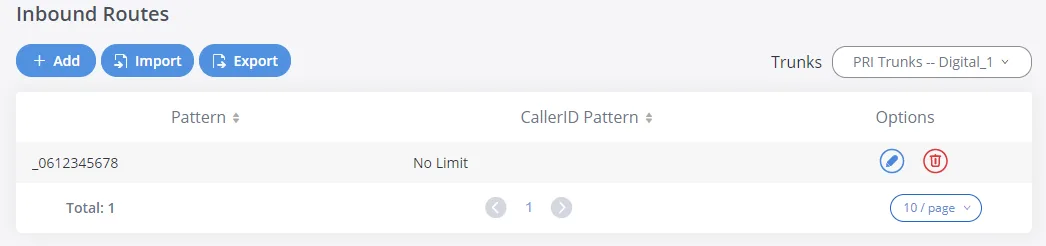
Screenshot: Interconnecting UCM6xxx with GXW450x Gateway, Grandstream documentation (accessed 2026-09-10); the number is the document's example.
Rule 2 — send the call to the PBX, to the ring group number. Trunks → Outbound Routes → Add: Calling Rule Name — any name (to-ats), Pattern — the same number, Main Trunk → Trunk = our SIP trunk from step 3. And most importantly — Strip and Prepend: without them the PBX receives the landline number, which is not in our numbering plan, and the call fails.
- Strip — how many digits to cut from the start: set the length of the landline number (
10for0612345678) to cut it entirely; - Prepend — what to put in its place: the ring group number (for example,
700) or an operator's extension number.
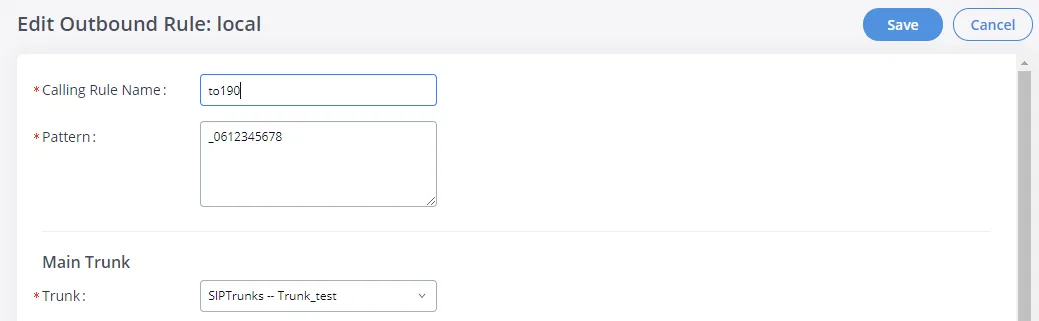
Screenshot: Interconnecting UCM6xxx with GXW450x Gateway, Grandstream documentation (accessed 2026-09-10); the Strip and Prepend fields are further down in the same Main Trunk block.
Click Save, then Apply Changes. Several landline numbers mean several pairs of rules: different numbers can go to different groups. If rule patterns overlap, the best match wins; with identical patterns — the first one in the list.
The caller's number. The gateway receives the caller's number from the line and can pass it in a separate header (Send PAI Header / Send PPI Header with PPI Mode = Original CID in the SIP trunk parameters). The operator panel does not show this number yet — the call appears as coming from the gateway's extension. Time Condition and Failover Trunk in an Outbound Route work inside the gateway, while the routing rules for provider numbers (schedule, voice menu) do not apply to calls from a gateway — a ring group with its own time-based variants covers the same need, see “Where to send incoming calls”.
About outgoing calls — honestly. You cannot currently call out from the PBX through this gateway's line: the PBX's outgoing rule only leads to a SIP provider line, and to the PBX the gateway is an extension. The GXW450X itself can do it (an Outbound Route to the digital trunk, the displayed number — DOD), but our PBX does not support such outgoing calls — do not configure them. Today this gateway is a way to receive calls on the trunk's landline numbers; outgoing calls go through a SIP provider number, see “Outgoing calls through the gateway — not yet”.
Line parameters: E1/T1/J1, PRI, SS7, MFC R2
Take all values from the operator — a mistake here does not mean “nothing works” but “the line is up, yet calls drop or do not get through”.
- Signalling: PRI_CPE — if the operator is on the other end (almost always); PRI_NET — if an old office PBX is on the other end. The two ends must have different roles.
- Clock: towards the operator — Slave.
- Coding: E1 —
HDB3orAMI, T1 —B8ZSorAMI. Framing: E1 with PRI or SS7 —ccs, E1 with MFC R2 —cas, T1/J1 —esf(default) ord4. CRC Validation for E1 —CRC4orNone, as the operator uses. Line Codec —alawfor E1,ulawfor T1/J1. - Switch Type for ISDN PRI:
EuroISDN(Europe),NI2(USA),DMS100,4ESS,5ESS,NI1,Q.SIG(link to an old office PBX). - SS7: ITU, ANSI or CHINA variant, point codes (Originating/Destination Point Code), First CIC.
- MFC R2: the ITU variant plus national ones — Argentina, Brazil, China, Czech Republic, Colombia, Ecuador, Indonesia, Mexico, the Philippines, Venezuela.
- Diagnostics: Maintenance → Signaling Troubleshooting — PRI, SS7 and MFC R2 traces with Start/Stop/Download buttons; the state of the line's channels is shown on the Dashboard.
Step 5. Check registration and a call#
- Registration on the gateway. On the Dashboard, in the trunks block, our SIP trunk should show Available (there are four statuses in total: Available, Busy, Abnormal and Unmonitored). Abnormal — see the registration section.
- Registration in the admin panel. The gateway's extension on the “Operators” tab should get a green dot.
- A call. Call the landline number from step 4 from a mobile — the ring group or the operator should ring. If nothing rings, check that the line is up (Dashboard), that both rules exist and that Apply Changes was clicked after them.
- Audio — the
*43echo test. Registration says nothing about audio: it travels as a separate stream. Temporarily enter*43in the Outbound Route's Prepend instead of the group number, click Save and Apply Changes, and call the landline number: the PBX will answer and start playing your own voice back with a short delay. You hear yourself — audio flows both ways. You hear the answer but not yourself — audio is not getting from the gateway to the PBX. Silence — it is not getting from the PBX to the gateway. After the test, put the group number back and click Apply Changes again. The manufacturer's documentation does not say whether the Prepend field accepts the*character; if it does not, check audio with an ordinary call to the group: answer it and make sure both sides can hear each other.
Everything about testing is in the overview, section “How to check”.
Factory reset#
A reset is needed if the web interface password is unknown (for example, the gateway came with the premises) or the configuration has become hopelessly tangled.
With the button on the case. The RESET button on the back panel: a long press is a factory reset, a short one is only a reboot. The manufacturer does not say how many seconds to hold it — which is why the next method is more reliable.
From the display. OK → scroll with DOWN to Factory Menu → OK → Factory Reset. Reboot (a plain restart) is in the same menu.
From the web interface. Maintenance → System Cleanup/Reset → Reset & Reboot, set Type to All and click Reset. The User Data type only erases call records, the operation log and service files — the settings stay.
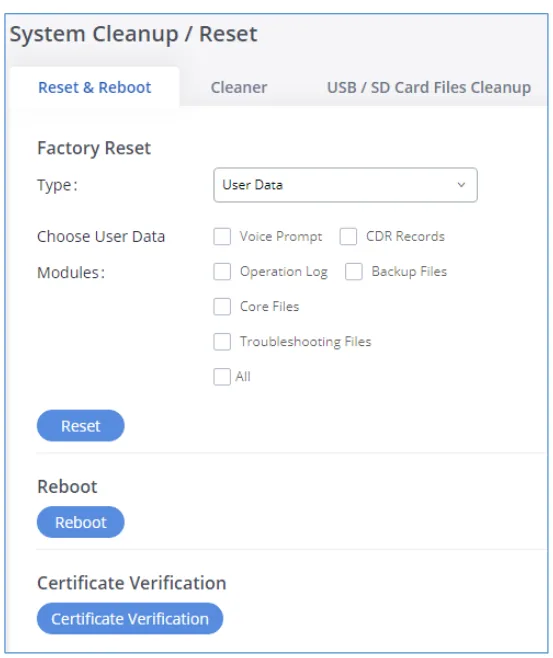
Screenshot: GXW450X User Manual (PDF, version 1.0.1.7), p. 142.
What gets erased: the whole configuration — trunks, routes, line parameters, network settings and web interface passwords. The firmware stays the same.
What to do afterwards: the gateway again takes an address via DHCP (look it up on the display), opens at https://<IP>:8089 and asks for the password from the sticker — until it is changed, it is also shown on the display under Factory Menu → Default Password. Then repeat steps 1–5. Resetting the gateway does not change the extension login in the admin panel, but you will have to issue the password again: it is shown only once, so go to Telephony → Operators → “Reset password”. General notes on resetting gateways — in the overview.
If the gateway does not register#
- The Peer SIP Trunk type is selected. Our PBX needs Register SIP Trunk: a Peer trunk does not register, and the PBX never learns about the gateway.
- Apply Changes was not clicked. Save only stores. Until Apply Changes at the top of the page is clicked, the gateway runs on the old settings.
- The login is incomplete or not everywhere. Username, AuthID and From User all need the whole
sip-…-<number>string, not the extension number from the credentials window. An empty From User can produce the picture “the trunk is registered, but the PBX rejects calls from the line”. - TLS or SRTP is enabled. Transport =
UDP, SRTP =Disabled— our PBX has neither TLS nor voice encryption. - Registered, but no call arrives. One of the two rules from step 4 is missing, Strip/Prepend are empty in the Outbound Route (the landline number goes to the PBX), or G.729 and OPUS are at the top of Codec Preference.
- The line itself is not up. PRI_NET and PRI_CPE are swapped, Clock is not
Slave, framing or CRC4 are wrong — see the “Line parameters” block in step 4 and the trace in Maintenance → Signaling Troubleshooting.
Note: after several failed login attempts the gateway's protection (Fail2ban, IP whitelist) may lock the administrator's computer out of the web interface. General causes (SIP ALG on the router, blocked UDP 5060) are in the overview, section “If the gateway does not register”; about the network — “Venue network, NAT and the SIM card”.
Models in the family#
| Model | E1/T1/J1 ports | Simultaneous calls | Network and case | Setup differences |
|---|---|---|---|---|
| GXW4501 | 1 × RJ45 | up to 30 (E1) / 23 (T1, J1) | 2 × gigabit RJ45 (WAN/LAN), 2 × USB 3.0, SD slot, 128 × 32 display, rack-mount case | the base model |
| GXW4502 | 2 × RJ45 | up to 60 | same | the two lines can be set up as two independent trunks or as one bundle with a shared D-channel |
| GXW4504 | 4 × RJ45 | up to 120 | same | port selection for outgoing calls into the line — DAHDI Out Line Selection (Ascend / Poll / Descend); not needed for our PBX |
All three share one firmware — 1.0.1.13 (2024-06-20, the last one: the family is discontinued), one web interface and identical setup as described on this page. There are no regional versions: E1, T1 and J1 are enabled in software on the same hardware. The manufacturer's certifications are FCC (USA), CE (Europe), RCM (Australia and New Zealand).
What to choose for our PBX
A GXW4501/4502/4504 already installed can be connected with confidence: it fully covers incoming calls from the line to a ring group and takes about half an hour to set up. Buying a new one is not worth it: the family is discontinued, and there will be no more updates or manufacturer support. If the venue is planning to leave its E1 line anyway, the right path is to port the numbers to a SIP provider (“Connecting a provider number to the PBX”) and keep the gateway for the transition period. Where ISDN is still alive and where it has already been switched off — see “By country”.
FAQ#
How many extensions does a gateway with 30 (or 120) channels need?#
One: all channels of the line reach the PBX through one SIP trunk, that is one extension, and the rules from step 4 tell which number was called — each landline number can go to its own ring group. If you have several E1 lines and it is more convenient to see them separately in the PBX, create a SIP trunk and an extension per line.
Can I call out through the E1 line from the PBX?#
Not yet. Through this gateway our PBX can only receive calls from the line; outgoing calls go through a SIP provider number. More — “Outgoing calls through the gateway — not yet”.
The operator panel does not show the caller's number — is that a fault?#
No. Right now a call from the line appears in the panel as a call from the gateway's extension. The gateway can pass the caller's number in a separate header (PAI/PPI), but the PBX does not show it yet. Putting the caller's number into the From field instead of the login does not work — the PBX will then not recognise its extension, and the call will not get through.
My operator provides SS7 or MFC R2 rather than ISDN — will it work?#
Yes, the gateway supports both: SS7 in ITU, ANSI and CHINA variants, MFC R2 in the ITU variant and ten national ones (the list is in the “Line parameters” block of step 4). Take the variant and parameters from the operator; the SIP side and routes are set up the same way as for PRI.
The gateway is discontinued — will it stop working?#
No: discontinued means there will be no new firmware and no manufacturer support. Install the last firmware 1.0.1.13, change the passwords of all web interface accounts after the upgrade, and do not expose the gateway's web interface to the internet.
Sources#
Manufacturer documentation, accessed 2026-09-10.
- GXW4500 Series User Manual — HTTPS:8089 login,
adminand the password from the sticker, the display menu (Network Info, Factory Menu → Factory Reset, Default Password), network defaults, VoIP trunks (Register SIP Trunk, From User, Username/Password/AuthID, Codec Preference, DTMF Mode, SRTP, Heartbeat, PAI/PPI), Inbound and Outbound Routes with Strip/Prepend, Digital Hardware and Digital Trunks, SIP Settings, trunk statuses on the Dashboard, reset (Maintenance → System Cleanup/Reset). - GXW450X User Manual, PDF, version 1.0.1.7 — the printed version of the same manual. Source of the reset screen screenshot (p. 142).
- GXW450X Quick Installation Guide — port connections, the IP address on the display, the OK/DOWN buttons, the
https://ipaddress:portnumberaddress, “admin” and the password from the sticker, the RESET button. - Interconnecting UCM6xxx with GXW450x Gateway — the “digital line → SIP” setup: an Inbound Route with a number pattern and an Outbound Route to the SIP trunk, Enable Heartbeat Detection, Apply Changes. Source of the SIP trunk and route screenshots on this page.
- GXW4500 Series Datasheet — 1/2/4 ports and 30/60/120 calls, codecs, the RESET button (“long press for factory reset”), 128 × 32 display, 12 V / 2 A power, certifications.
- GXW450x Firmware Release Notes 1.0.1.13 — firmware version and date, the requirement to run at least 1.0.0.35 and to change the passwords of all web interface accounts.
- Grandstream Firmware and Product Archive — GXW4501/4502/4504 on the End-Of-Life list, last firmware 1.0.1.13.