Sangoma Vega 50/60/100/200/400 — setup for our PBX
Sangoma Vega is a line of "office" gateways from the Canadian company Sangoma; it inherited the line from the British VegaStream, which is why older documents and screens show the VegaStream logo. Three groups matter for a venue: the analogue Vega 60G for 4 or 8 landlines (FXO ports; there is a 4 FXS + 4 FXO version for old phones), the Vega 60G BRI for two ISDN BRI lines (sold mainly in the UK) and the Vega 100G / 200G / 400G for ISDN PRI E1/T1 trunks. It is a choice for a site that already has a Vega or whose number arrives over an E1/T1 trunk. For one or two analogue lines there are simpler and cheaper gateways — see the family table in the overview.
To our PBX the gateway is just another extension: it registers on the PBX server and, when someone calls the line, dials a ring group or an operator by itself. What is the same for all gateways (credentials, where to send incoming calls, network, limitations) is in the overview “GSM gateways and landlines”. This page is the step-by-step guide for Vega, with screenshots from Sangoma's documentation.
Two Vega rules worth remembering up front: the Quick Config wizard overwrites the gateway's entire configuration, including manual changes in Expert Config — so do Quick Config first and Expert Config after it; and Vega has no reset button — a reset is done with a command, and the licence is erased together with the settings (see “Factory reset”).
What you need#
- Extension credentials from the admin panel: Telephony → Operators → create an operator for the gateway (for example, “Vega gateway, landline”) → “Reset password” → the “Extension credentials” window: SIP server, Extension number, Login, Password, Port
5060, TransportUDP. The password is shown once — copy it into the gateway right away. Details — “Extension credentials for the gateway”. - How many extensions: one for the whole gateway. In Quick Config the registration is made "for the whole gateway" (Registration Mode = Gateway): all FXO lines and all ISDN channels go through one account.
- The number the gateway will send incoming calls to: a ring group number (Telephony → “Ring groups”, numbers from 700) or an operator's extension number.
- Line: an analogue landline into an FXO port (RJ-11) on the Vega 60G; an ISDN line from the operator's equipment into a BRI port (RJ-45) on the Vega 60G BRI or into an E1/T1 port (RJ-45) on the Vega 100G/200G/400G.
- A network cable into port LAN 1, a computer with a browser and a mobile phone to call the line. For a reset you will need the console cable from the box (RJ-45 → USB or DB9) and a terminal program (PuTTY or similar).
Step 1. Find the gateway's IP address#
With factory settings the Vega gets an address from the venue's router via DHCP on port LAN 1. You can find it like this:
- Vega Scanner — a Sangoma utility that scans the subnet and finds Vega gateways in it (the download link is in the knowledge base article "Finding IP Address").
- The DHCP lease list in the router — look for the MAC address from the sticker above the LAN port. Vega MAC addresses start with
00:50:58; the MAC of LAN 1 matches the serial number. - A network scan —
nmap -sP <your network>, thenarp -aand the same MAC. - Without DHCP the Vega assigns itself an address:
169.254.XX.YY, whereXXandYYare the last two bytes of the port's MAC address in decimal. For example, a MAC of00:50:58:04:0A:1Egives169.254.10.30. Give the laptop an address169.254.<any>.<any, but not YY>with mask255.255.0.0and connect it to the gateway. - By voice from a handset (only models with FXS ports: 60G 4 FXS + 4 FXO, 3050G, Vega 50 with FXS): plug an analogue phone into an FXS port, lift the handset, dial
#1#1, then111— the gateway reads out the LAN 1 IP address (112— mask,101— default gateway). FXO-only models do not have this option. - Console — with the cable from the box: speed 115200, 8N1, XON/XOFF flow control (Vega 50 — 9600). After logging in,
show .lan.if.1.ipshows the address.
Step 2. Log in to the web interface#
Open http://<gateway IP address> in a browser. The factory login and password depend on the firmware version:
| Firmware | Models | Login | Password |
|---|---|---|---|
| R12.0 and earlier | 60G, 60Gv2, 60G BRI, 100G, 200G, 400G, 3050G, 4×4; Vega 50 (R8.8) | admin |
admin |
| R13.0 / R13.1 | 100Gv2, 200Gv2, 400Gv2, 3050Gv2; other G models if R13.0 was installed on them | admin |
the gateway's serial number in lower case — it is also the lowest MAC address, printed on the nameplate and the box; at the first login the gateway requires you to set a new password |
The firmware version is shown on the first page (Status, the "Firmware File" line), and the hardware revision (v2) on the rear nameplate.
Change the password right away. Sangoma says so directly: "It is advisable to change the admin password to something other than 'admin'". The field is Login Password on the Quick Config → Basic tab (step 3). In R13 Telnet login was removed; besides the web interface, SSH and the console remain.
How the interface is laid out. On the left there are three sections: Status (the state of the gateway, including the SIP Registrations block), Quick Config (a wizard of tabs Basic → VoIP → FXO / FXS / BRI / T1/E1) and Expert Config (detailed settings: System, LAN, SIP, Dial Plan, CLI and more). When you enter Quick Config, the gateway shows a warning — read it and press Continue. Leave Quick Config only with the Submit or Exit buttons next to the tabs: navigating via the left menu may lose what you entered.
Step 3. Enter the PBX credentials#
Registering a Vega on an external PBX is a standard Sangoma scenario (the article "Registering Vega with FreePBX (PJSIP on port 5060)", "This guide applies to all Vega products"). Everything is done in Quick Config:
- Basic tab: Country (it defines the line tones: "You must specify the correct country or the Vega will not be able to recognize the tones"), time zone, network, Codecs and Login Password.
- VoIP tab: Registration Mode = Gateway; SIP Server IP/Name — the address of our PBX; port 5060; Registration and Authentication ID and Authentication Password — the extension's login and password. The SIP Domain and Proxy Address fields — the same server address; leave Outbound Proxy empty (
0.0.0.0). - The last tab — FXO, BRI or T1/E1 (ports and the incoming route, step 4) → Submit → OK. The gateway applies and saves the settings; if a restart is needed, it asks by itself (the Reboot System button turns red).
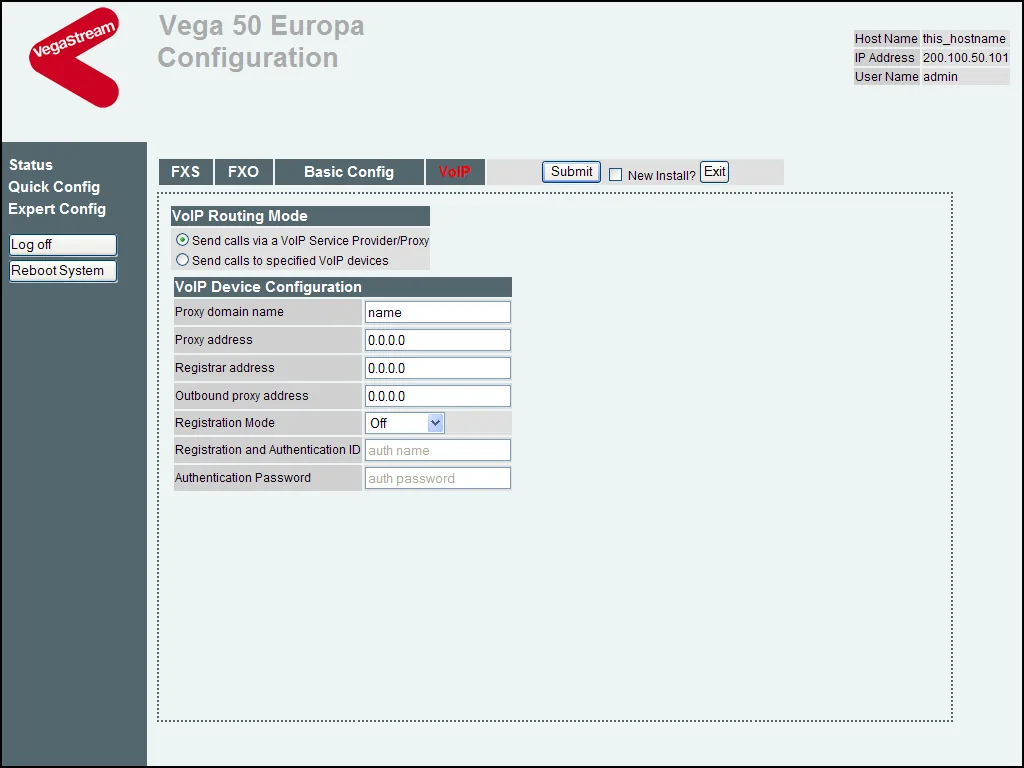 Screenshot: Quick Config reference guide (R8.1+, v0.5, VegaStream, 2007), p. 11. An old firmware screen: in current R12/R13 the fields are called SIP Server IP/Name, SIP Domain, Proxy Address, and the Registration Mode list shows "Gateway" instead of "per gateway".
| In the admin panel (“Extension credentials”) | Field in the Vega (Quick Config → VoIP) |
|---|---|
| SIP server | SIP Server IP/Name, SIP Domain, Proxy Address — the same value in all three; Outbound Proxy — empty |
Login sip-…-<number> |
Registration and Authentication ID — the whole string |
| Password | Authentication Password |
Port 5060 |
the port next to SIP Server (5060) |
Transport UDP |
UDP by default — do not change it; we accept TCP too, we have no TLS |
| Registration | Registration Mode = Gateway (not "Off": Sangoma's templates for PBXs without registration use Off) |
| Extension number | not entered — just remember which extension the gateway uses |
The "From" field — a mandatory change after Quick Config. By default the Vega puts the caller's number from the line into the "From" field, while our PBX recognises the extension by the login in that field: registration will be green, but incoming calls will be rejected. Open Expert Config → SIP → SIP profiles → Modify on the profile → From Header userinfo = auth_username → Apply → Save. This mode is described in Sangoma's FAQ ("authentication username is used in the From: header"). Remember: every Submit in Quick Config resets this field back to the caller's number — repeat the change after any edit in the wizard.
Codecs, DTMF, NAT
- Codecs — Quick Config → Basic → Codecs:
g711Alaw64kfirst (Europe, Russia),g711Ulaw64ksecond (the other way round in North America). Remove G.729 and G.723.1 or put them last: in older firmware G.729 is first by default, and our PBX does not use it. Vega has no G.722, so audio will be regular telephone quality. - DTMF — leave it alone: by default the Vega sends tones via RFC 2833, as the PBX needs.
- NAT — the Vega's built-in NAT handling is off by default, and there is no need to turn it on: the gateway registers on the PBX by itself and repeats the registration (every 600 seconds by default), no port forwarding is needed. Turn off SIP ALG on the router.
- TLS and SRTP are supported by the Vega but are not needed for our PBX.
Step 4. Send incoming calls to the PBX#
With registration on, the Vega sends all calls from the lines to the PBX — all that remains is to set which number to dial. An analogue line carries no destination number ("Inbound calls from a POTS line do not have a called party telephone number"), so it is set in the gateway.
Analogue lines (FXO). Quick Config → FXO tab, one row per port:
- DID to Forward to SIP — the number the gateway will dial in the PBX: a ring group number (from 700) or an operator's extension number. Different lines can go to different groups.
- Enable Caller ID Detection — turn it on for every port (the gateway will receive the caller's number from the line).
- Tone Based Disconnect — turn it on: hang-up detection by the busy tone (works when the country on the Basic tab is right).
- The Telephone number(s) to route to the FXO interface field is for outgoing calls through the line; leave it alone for our PBX.
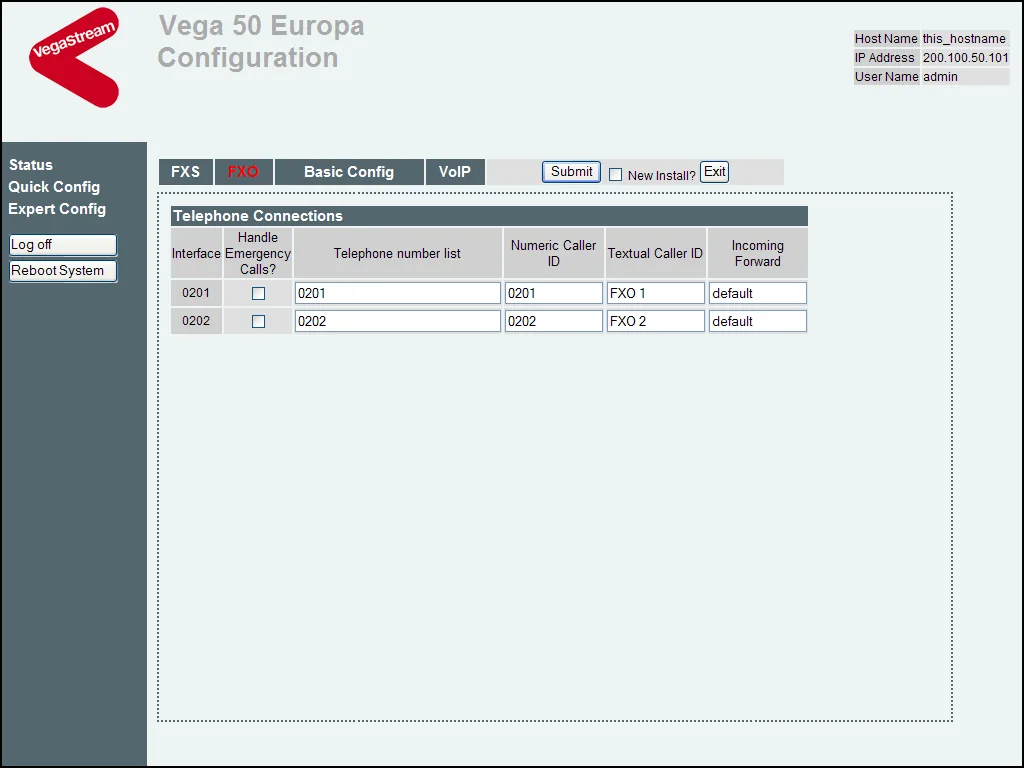 Screenshot: Quick Config reference guide (R8.1+, v0.5, VegaStream, 2007), p. 16. On old firmware the incoming number is set in the Incoming Forward column; in R12/R13 it is called DID to Forward to SIP; the Caller ID and Tone Based Disconnect checkboxes are not on this screen yet.
The same via Expert Config → Dial Plan (more precise, per port)
A rule in the To_SIP profile from Sangoma's "FXO Hotline" article: source IF:02..,TELC:<.*> (any FXO port) → destination IF:9901,TEL:<ring group number>,TELC:<1>. To send lines to different groups, make one rule per port: IF:0201 → TEL:700, IF:0202 → TEL:701. Vega interface numbers: FXS — 0101…, FXO — 0201…, BRI — 0301…, E1/T1 — 0401…, SIP — 9901. After editing — Apply and Save; remember that Submit in Quick Config will overwrite these rules.
ISDN (Vega 60G BRI, Vega 100G/200G/400G). First the ports on the BRI or T1/E1 tab of Quick Config:
- Port role. The port to the operator's line must work as a subscriber (TE) — the "NT?" checkbox cleared. On the 60G BRI ports 2 and 4 are in NT mode by default; on E1/T1 the checkbox is ticked only on ports to a PBX. On the Vega 100G/200G the roles are fixed: port 1 — to the operator, port 2 — to a PBX.
- Protocol and Framing —
auto(for E1 that is ETSI ISDN and HDB3); Number of Channels — as many channels as the operator sold.
The operator passes the dialled number (MSN/DDI) over ISDN, and the Vega sends it to the PBX as is, but our PBX does not know such numbers for the gateway extension. Fix the ring group number with a To_SIP rule the same way as for FXO, only with the source IF:03.. (BRI) or IF:04.. (E1/T1); check the syntax against the Dial Plan of your firmware. All numbers of the trunk will then arrive at one group.
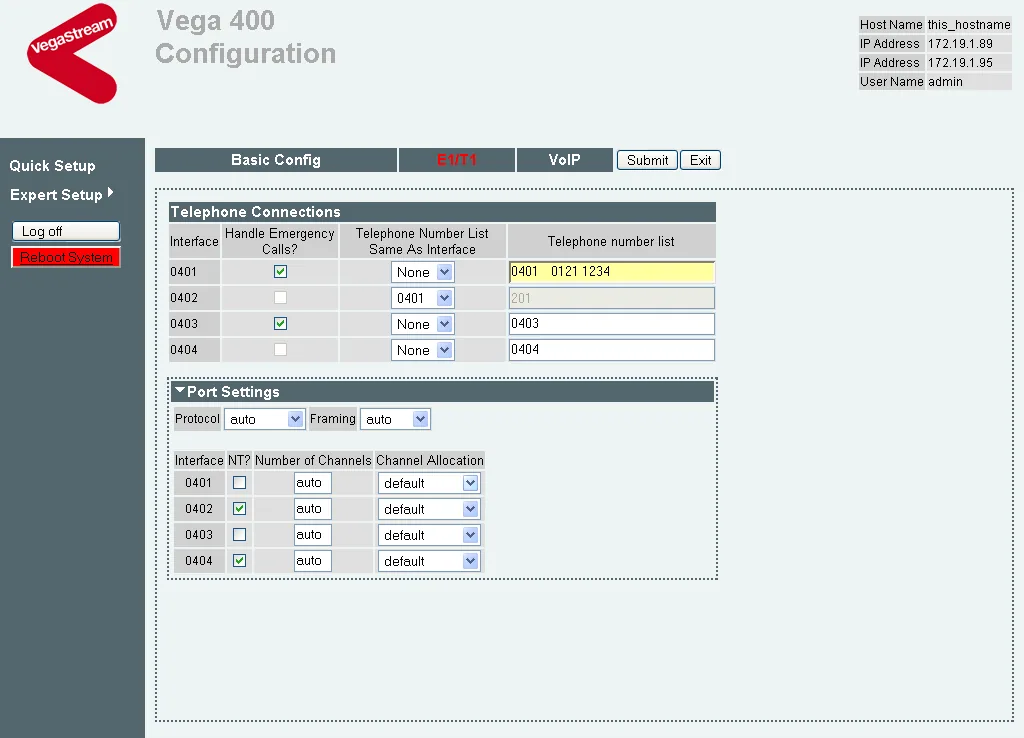 Screenshot: Quick Config reference guide (R8.1+, v0.5, VegaStream, 2007), p. 18.
Caller's number. With From Header userinfo = auth_username (step 3), the caller's number does not get into the "From" field, and in the operator panel the call shows as coming from the gateway's extension. Routing rules for provider numbers (schedule, voice menu) do not apply to calls from the gateway — a ring group with its own time-based variants covers the same need (see “Where to send incoming calls”).
Outgoing calls. Calling out from the PBX through this gateway's lines is not possible yet: the PBX's outgoing rule only leads to a SIP provider's line. The Vega itself can do it (the "Telephone number(s) to route to the … interface" field, the To_FXO profile), but do not configure that part for our PBX. Outgoing calls from your own number go through a SIP provider; more in “Outgoing calls through a gateway — not yet”.
FXO lines: country, impedance, hang-up
- Country (Quick Config → Basic → Country) defines the tones and line parameters; the list in old R8.8 firmware is the UK, US, Argentina, Austria, Australia, Belgium, Brazil, Canada, Chile, Spain, France, India, Italy, Mexico, the Netherlands, Russia, Sweden; check the list of current firmware in the gateway itself.
- Line impedance — CTR21 for Europe, the UK and Israel, 600R for the US, Canada, Latin America, China, Saudi Arabia, the UAE; there is also 900R. A wrong one works, but with more echo.
- Hang-up. The Vega detects that the caller hung up in three ways: by a short loss of line current, by a polarity reversal and by the busy tone (Tone Based Disconnect). If none of them fires, the call "hangs" at the operator — check the country.
- The caller's number from the line — Bell, BT, ETSI FSK and ETSI DTMF formats; turned on with the Enable Caller ID Detection checkbox.
Step 5. Check registration and a call#
- Registration in the gateway. The Status section → the SIP Registrations block (the Show button opens the details) — the account must be registered.
- Registration in the admin panel. Telephony → the “Operators” tab — the gateway extension has a green dot.
- A call. Call the landline number from a mobile — the operators of the group (or the operator) from "DID to Forward to SIP" should ring. Hang up — the call at the operator should end within seconds; if it hangs, check the country and Tone Based Disconnect (step 4).
- Audio — the
*43echo test. Registration says nothing about audio. Temporarily enter*43in DID to Forward to SIP (orTEL:*43in theTo_SIPrule) and call the line: the PBX plays a short beep and then returns your voice with a delay — talk for about ten seconds. You hear the beep and yourself — audio works both ways; beep but not yourself — audio does not reach the PBX from the gateway; not even a beep — audio does not reach the gateway from the PBX. The test result is shown in the call log. After the check put the group number back — and, if you changed it via Quick Config, set From Header userinfo = auth_username again (step 3).
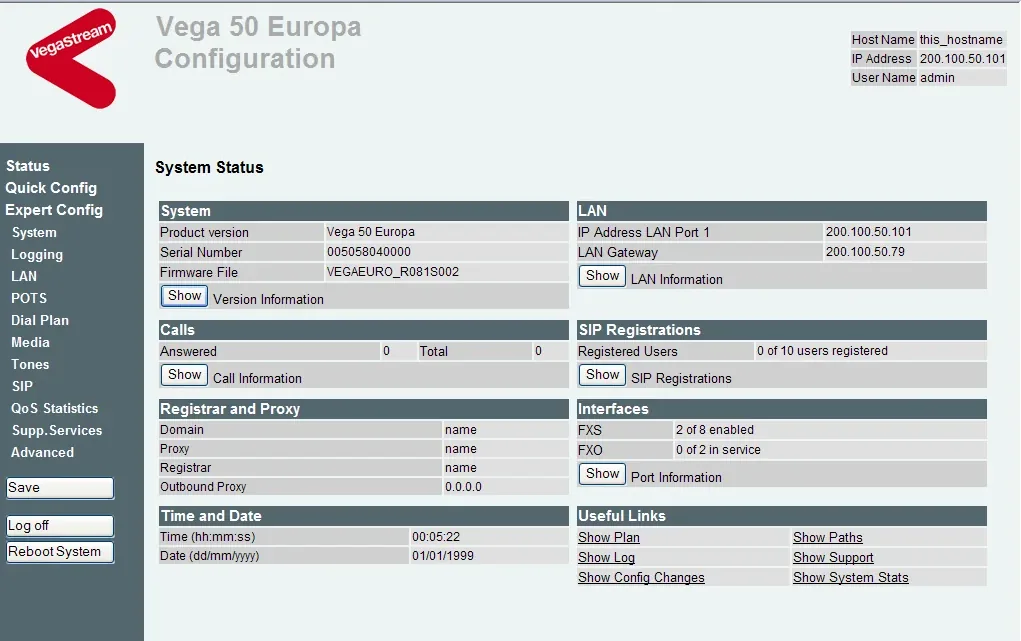 Screenshot: Quick Config reference guide (R8.1+, v0.5, VegaStream, 2007), p. 7.
Everything about checking is in the overview, section “How to check”.
Factory reset#
A reset is needed if the gateway came with someone else's configuration, does not work properly or the password is forgotten. Vega has no Reset button — the reset is done with a CLI command.
Save the licence first — the reset erases it ("You will lose your license when performing the following reset"). In the web interface: Expert Config → System → Update License — copy the key string and keep it. Via the console: the upgrade command, then license. If you could not get the key, open a ticket with Sangoma support (support.sangoma.com) with the gateway's serial number before the reset.
Reset:
- Connect the console cable from the box to the Console port on the rear panel and to the computer; terminal settings — 115200 bit/s (Vega 50 — 9600), 8N1, XON/XOFF. The command can also be entered in the web interface: Expert Config → CLI.
- Log in and enter one of the commands:
| Command | What is erased |
|---|---|
factory reset |
all settings except the IP address and related network parameters |
factory reset full |
all settings, including the IP address; the password returns to the factory one |
- Restart the gateway:
reboot system— changes take effect only after the reboot.
What to do afterwards. After factory reset full the gateway again takes an address via DHCP on LAN 1 (step 1), the login is the factory one (admin / admin or the serial number on R13, step 2). Restore the licence: Expert Config → System → Update License → paste the key → Submit, or in the console upgrade → license <key> → save → apply → reboot system. Then go through steps 3–4 again. A gateway reset does not change the extension's login and password in the admin panel; if the extension password was not kept, issue a new one with the “Reset password” button.
Forgotten password. The reset command requires logging in to the CLI. For old firmware (Vega 50, R8.8) Sangoma describes the only way: the boot loader menu over the console at 9600 bit/s, item "3) Config Clear" — it erases everything, including the IP address. For R12/R13 a procedure without the password is not described in the documents — contact Sangoma support. General notes on resetting gateways — in the overview.
If the gateway does not register#
- Registration Mode = Off. Sangoma's templates for PBXs "without registration" leave it Off — our PBX needs Gateway (Quick Config → VoIP).
- The server rejects the registration. Registration and Authentication ID must contain the whole login
sip-…-<number>, the password must be the latest issued; SIP Server, SIP Domain and Proxy Address — one and the same address of our PBX, Outbound Proxy — empty; port 5060, transport UDP, do not enable TLS. - Registration is green but incoming calls are rejected. The caller's number goes into the "From" field: after another Submit in Quick Config From Header userinfo was reset — set auth_username again (step 3).
- The call reaches the PBX but goes nowhere. "DID to Forward to SIP" is empty (without a destination number the Vega cannot make a SIP call) or the group number cannot be dialled from PBX phones.
- The call does not end after hang-up or the caller's number is not detected — wrong Country on the Basic tab.
- ISDN does not come up. The port to the operator is in NT mode (the "NT?" checkbox), on the 100G/200G the operator's line is not in port 1, or the number of channels is wrong.
General causes (SIP ALG on the router, UDP 5060 blocked) are in the overview, section “If the gateway does not register”; about the network — “Venue network, NAT and SIM card”.
Models in the family#
The letter G marks the second generation (R12/R13 firmware); v2 is a hardware revision with its own firmware: v2 firmware on a v1 unit ("will cause serious issues") and vice versa cannot be installed; check the revision on the nameplate.
| Model | Ports / channels | Network / line | Setup differences |
|---|---|---|---|
| Vega 60G / 60Gv2 — 4 or 8 FXO | 4 or 8 FXO (RJ-11), 1 LAN | analogue landline | FXO tab; R12.0, admin / admin |
| Vega 60G / 60Gv2 — 4 FXS + 4 FXO | 4 FXS + 4 FXO, 8 channels | lines + analogue phones | FXO — as above; phones on FXS are extensions, see “SIP phone setup” |
| Vega 60G BRI | 2 BRI S/T (RJ-45), 4 calls | ISDN BRI | BRI tab; ports 2 and 4 are NT by default; 4/8 BRI — special order |
| Vega 100G / 100Gv2 | 2 E1/T1 (RJ-45), licence for 30 sessions — one port goes to SIP | ISDN PRI, CAS/R2 | T1/E1 tab; port 1 — to the operator, port 2 — to a PBX (swap only with a crossover cable); 100Gv2 — R13.1, password = serial number |
| Vega 200G / 200Gv2 | 2 E1/T1, up to 60 calls | ISDN PRI, CAS/R2 | like the 100G; 200Gv2 — R13.1 |
| Vega 400G / 400Gv2 | 4 E1/T1, 30–120 calls by licence | ISDN PRI, QSIG, CAS/R2 | 4 bypass ports for failover to a second 400G; 400Gv2 — R13.1 |
| Vega 3050G / 3050Gv2 + FXO Plug-In Module | 50 FXS + 2 FXO (module sold separately) | phones + backup lines | primarily an FXS gateway; 3050Gv2 — R13.1 |
| Vega 4×4 | up to 16 analogue ports on FXO / FXS modules | lines / private wires | niche — financial-sector "hotlines" |
| Vega 60G 4 BRI + 4 FXS | 4 BRI + 4 FXS | ISDN BRI + phones | discontinued, support ended 31.12.2025 |
| Vega 50 (4/8 FXO, FXS + 2 FXO, 2/4/8 BRI) | 2–10 ports | lines / ISDN BRI | discontinued, support ended 30.06.2019; R8.8 firmware, console 9600; replacement — Vega 60G |
| Vega 100 / 200 / 400 first generation | 1–4 E1/T1 | ISDN PRI | discontinued, support ended 01.01.2016; R8.8 firmware; replacements — 100G/200G/400G |
For analogue lines, if you choose a Vega, take the 60G FXO; for British ISDN2 — the 60G BRI; for an E1/T1 trunk — the 100G/200G/400G. Do not buy the Vega 50 or the Vega 100/200/400 without the letter G new: there will be no more firmware for them.
FAQ#
Can I call out from the PBX through this gateway with the landline number?#
Not yet — with us the gateway works for incoming calls only. The Vega itself can make outgoing calls (numbers for the line on the FXO tab and the To_FXO profile), but our PBX does not yet send calls to a gateway extension as to a line. Outgoing calls from your own number go through a SIP provider.
The admin password does not work. What is the factory one?#
On R13 firmware (v2 models: 100Gv2, 200Gv2, 400Gv2, 3050Gv2) the factory password is the gateway's serial number in lower case; it is also the lowest MAC address from the nameplate. If that does not work either, the password has been changed — a reset is needed (see “Factory reset”).
Why is the caller's number not shown in the panel?#
For the PBX to recognise the call as coming from the extension, the gateway puts our login into the "From" field (From Header userinfo = auth_username, step 3), and the caller's number does not get there. Do not switch back to "Calling Party" — incoming calls would stop being accepted.
How many extensions does a gateway with 4 or 8 lines need?#
One: in Registration Mode = Gateway the gateway registers one account and sends calls from all lines through it. Lines can be sent to different groups with the numbers in "DID to Forward to SIP".
My From and Dial Plan settings disappeared. Why?#
Someone pressed Submit in Quick Config: the wizard overwrites the whole configuration, including Expert Config changes ("Any modifications performed in Quick Config will overwrite ALL configuration on the Vega"). Repeat the changes from steps 3–4 in Expert Config.
Sources#
Sangoma documents, accessed 10.09.2026:
- Vega Gateways — Registering Vega with FreePBX (PJSIP on port 5060) (KB) — https://sangomakb.atlassian.net/wiki/spaces/VG/pages/33456910
- Vega Gateways — Vega (registering Vega 100/200/400 and Vega FXO, KB) — https://sangomakb.atlassian.net/wiki/spaces/VG/pages/33850219
- Vega Gateways — Finding IP Address (KB) — https://sangomakb.atlassian.net/wiki/spaces/VG/pages/32636975/Finding+IP+Address
- Vega Gateways — Factory Reset (KB) — https://sangomakb.atlassian.net/wiki/spaces/VG/pages/32048142/Factory+Reset
- Vega Gateways — FXO with a Generic PBX — Vega 50/60G (KB) — https://sangomakb.atlassian.net/wiki/spaces/VG/pages/33620516
- Vega Gateways — FXO Extensions — Vega 50/60G (KB) — https://sangomakb.atlassian.net/wiki/spaces/VG/pages/33587711
- Vega Gateways — FXO Hotline — Vega 50/60G (KB) — https://sangomakb.atlassian.net/wiki/spaces/VG/pages/33849740
- Vega Gateways — Vega 50/60G BRI with a Generic PBX (KB) — https://sangomakb.atlassian.net/wiki/spaces/VG/pages/33424006
- Vega Gateways — Vega FAQ (KB) — https://sangomakb.atlassian.net/wiki/spaces/VG/pages/35193261
- Vega Gateways — Vega Release 13.0 (KB) — https://sangomakb.atlassian.net/wiki/spaces/VG/pages/32571746
- Vega Gateways — Firmware Downloads (KB) — https://sangomakb.atlassian.net/wiki/spaces/VG/pages/32375186
- Vega Gateways — Hardware Installation (KB) — https://sangomakb.atlassian.net/wiki/spaces/VG/pages/32505950
- Vega Gateways — Configure a Vega behind a NAT (KB) — https://sangomakb.atlassian.net/wiki/spaces/VG/pages/32081255
- Vega Admin Guide R8.8 v1.1 (2012) — https://ftp.sangoma.com/vega/docs/Vega_Admin_Guide_R88_v1.1.pdf
- Quick Config reference guide (R8.1+, v0.5, VegaStream, 2007) — https://ftp.sangoma.com/vega/docs/Quick%20config_R81_05.pdf
- IN_11 FXS and FXO useful info (v0.8, VegaStream, 2004) — https://ftp.sangoma.com/vega/docs/IN_11_FXS%20and%20FXO%20useful%20info_8.pdf
- Vega Gateway Series Analog/Digital — Datasheet (2022) — https://sangoma.co.uk/wp-content/uploads/2024/09/Sangoma-Vega-Series-Datasheet.pdf
- Vega 12.0 Release Notes — https://ftp.sangoma.com/vega/firmware/vega-12.0/release_notes.txt · Vega 13.1 Release Notes — https://ftp.sangoma.com/vega/firmware/vega-13.1/release_notes.txt
- Sangoma End-Of-Life (EOL) — https://sangoma.com/legal/end-of-life-eol/
- Product pages Vega 60G, 60G BRI, 100G, 200G, 400G — https://sangoma.com/products/phones-and-hardware/product/vega-60g/ · https://sangoma.com/products/phones-and-hardware/product/vega-60g-bri/ · https://sangoma.com/products/phones-and-hardware/product/vega-100g/ · https://sangoma.com/products/phones-and-hardware/product/vega-200g/ · https://sangoma.com/products/phones-and-hardware/product/vega-400g/